Just finished this one last week and have started on another, using a small 1800® Tequila bottle and a refreshingly different palette—different for, me at least.
How 'bout a sneak peek?
Bluegreen and Silver Bottle 12" x 4" x 4" | 36 cm x 10 cm x 10 cm. Mirror and Van Gogh glass
Just finished this one last week and have started on another, using a small 1800® Tequila bottle and a refreshingly different palette—different for, me at least.
How 'bout a sneak peek?
All of the above bottles, except for the purple and silver one in the lower right, were made years ago and I did not have good photos of them. Now, as I am considering a storefront for decorative items, note cards, and books, I need good photos for these bottles, as well as the ones that I plan to make in the next few weeks.
These are very difficult to photograph due to the highly reflective glass surface, and especially due to the mirror glass. The idea of trying to get good photos made me want to just pack them up and take them into a professional. The cost of doing that, however, made me try harder to find a way to take the pics myself.
AmazonBasics Portable Photo Studio. (This image is from the Amazon site.)
This led me to look into light boxes/light tents, and I found the AmazonBasics Portable Photo Studio, pictured at left. After reading up on it, I decided to order one and try it out.
The day after receiving it, I used it to photograph the purple and silver bottle which I had just finished. This went well and I was able to photograph those other five bottles the same day.
Overall, I am pleased with the results and I think it would be very helpful in photographing just about anything that will fit inside it—and it is a generous size.
I had to do a bit of work on the photos in Photoshop, as there was still an issue with my reflection on a few of the mirror tess. A tripod would have helped a little, but its reflection would still have shown. Fortunately, I have just enough Photoshop skill to mostly take care of this issue. These pics may not be professional quality, but I think they look pretty good.
So, at this point, my review can be summed up as: I love this thing! It should help me take good pics of small to medium-sized wall art, as well, although I have not tried that yet. If you are challenged to get the lighting right and produce better photos of your work, you may want to try something like this.
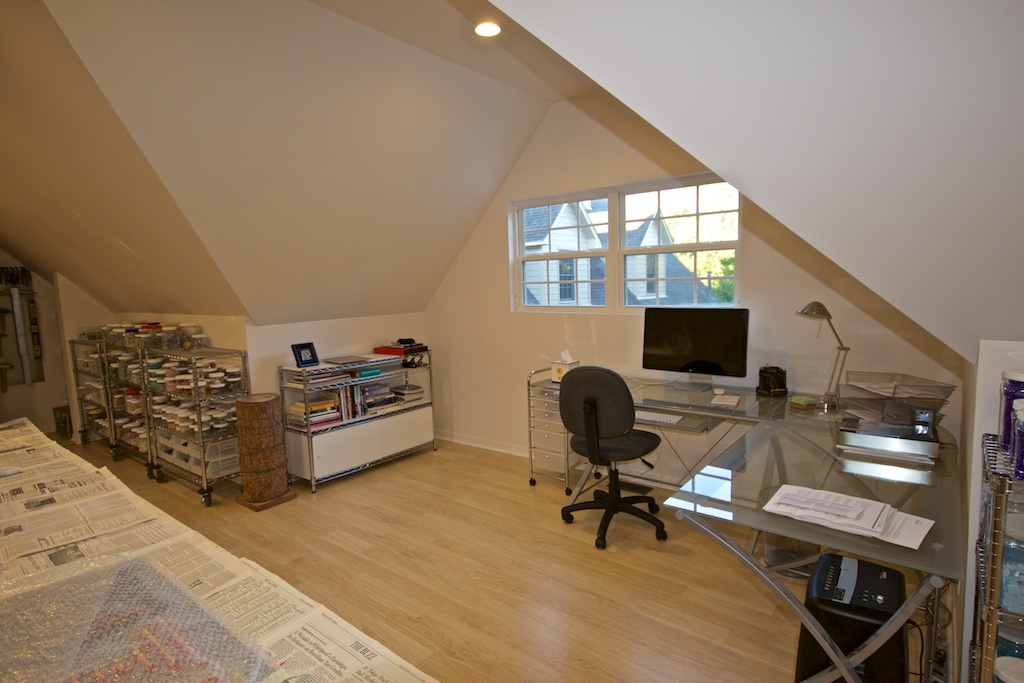
As promised, here are final pics of the studio wing, after furnishing and a bit of decor. I absolutely love my new space! Our dog, Lucy, seems to enjoy keeping me company in this light and airy space.
So here it is! I've included just a few before pics as well.
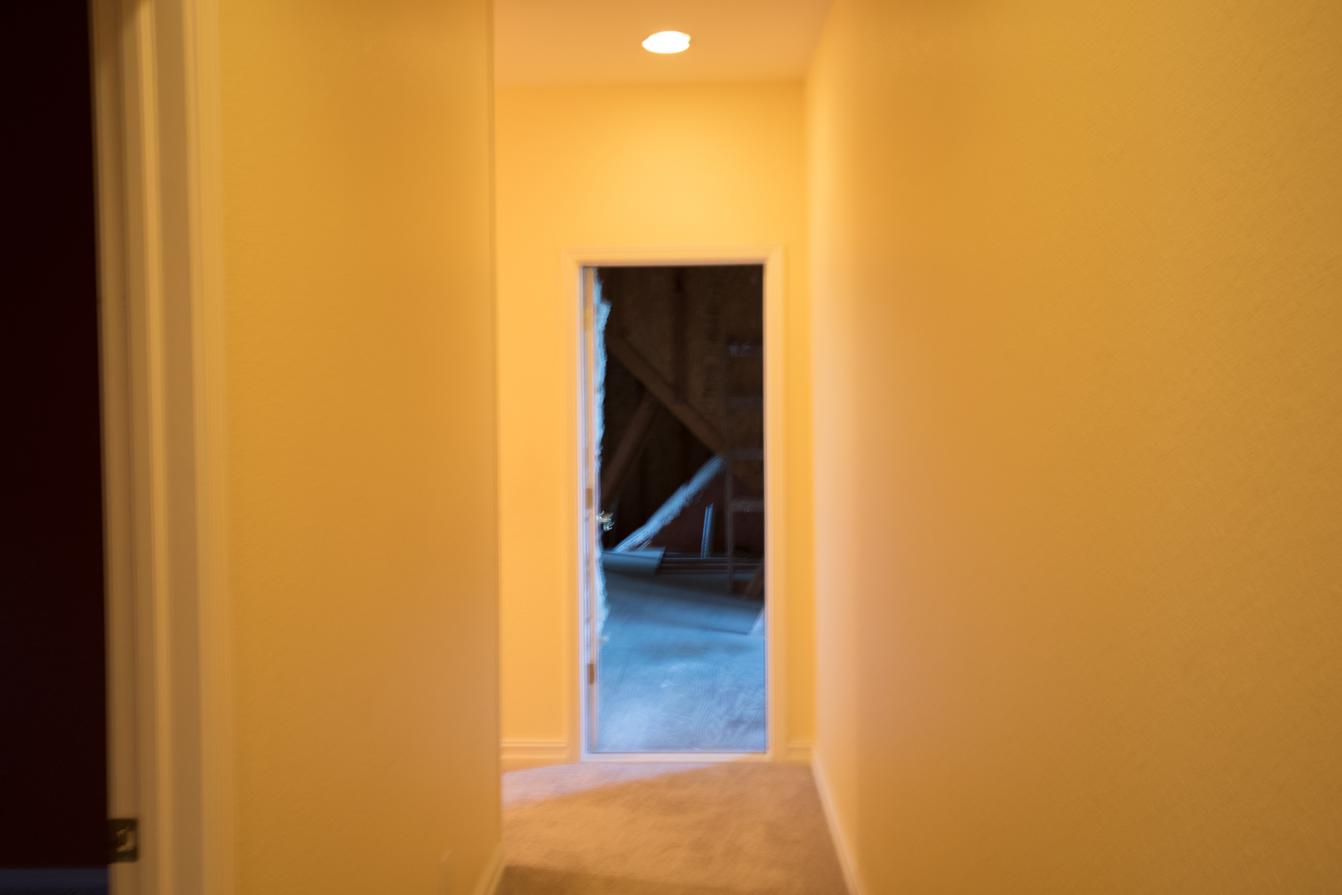
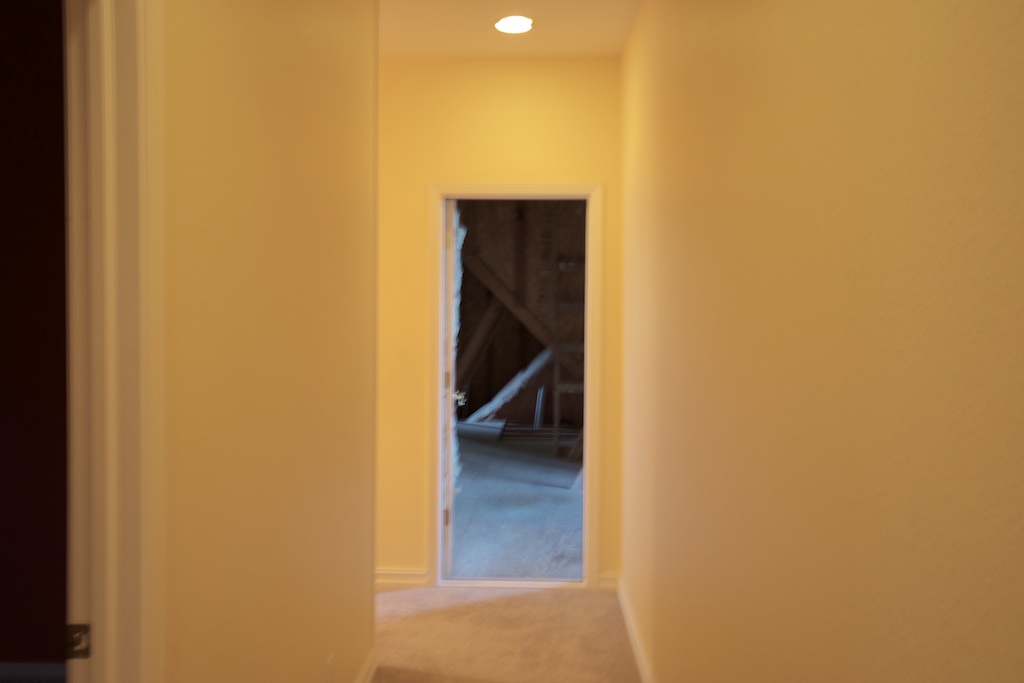
Before construction: Attic door at end of hallway.
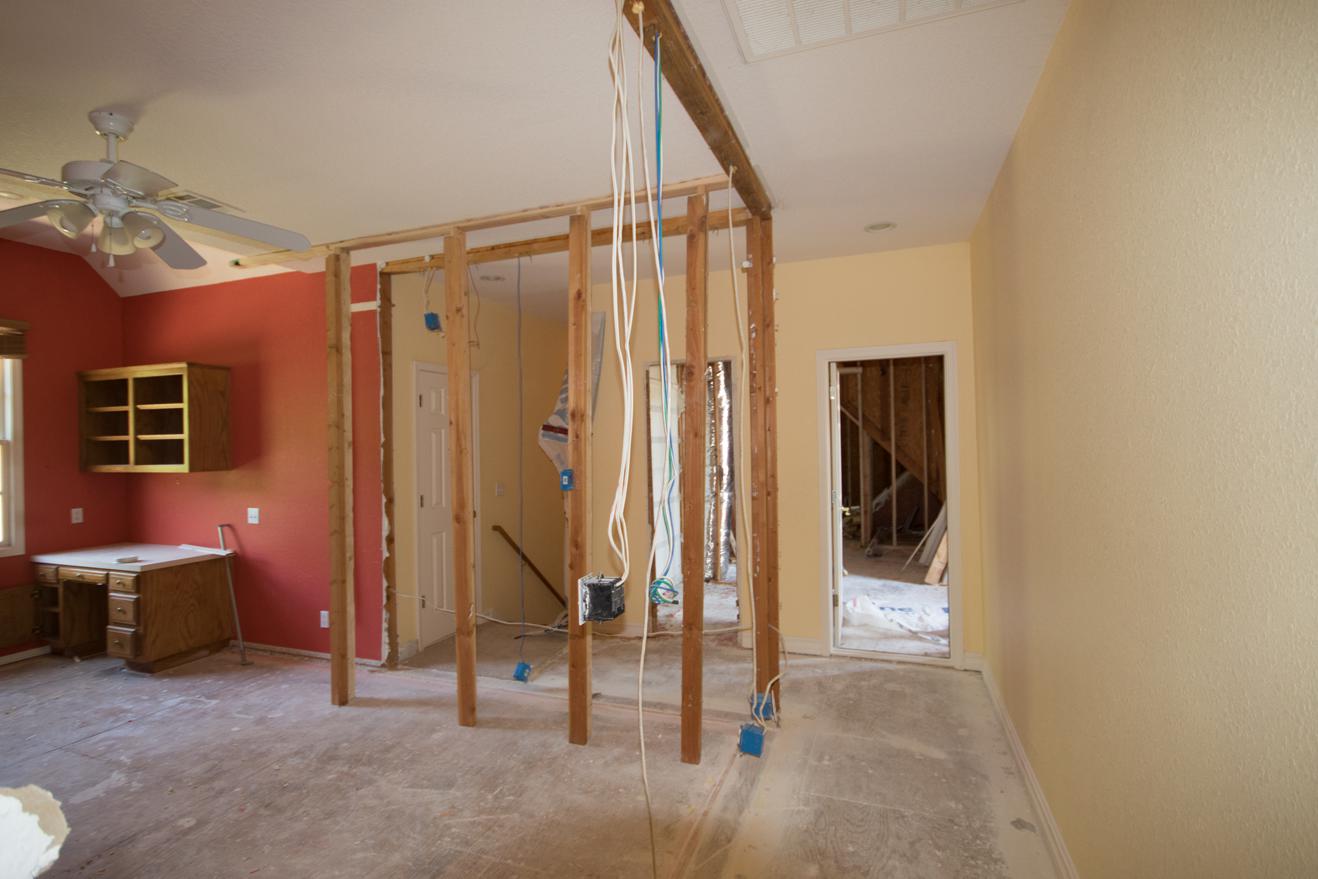
Construction has begun: Most of the bedroom on the left has been removed, opening up the end of the hall.
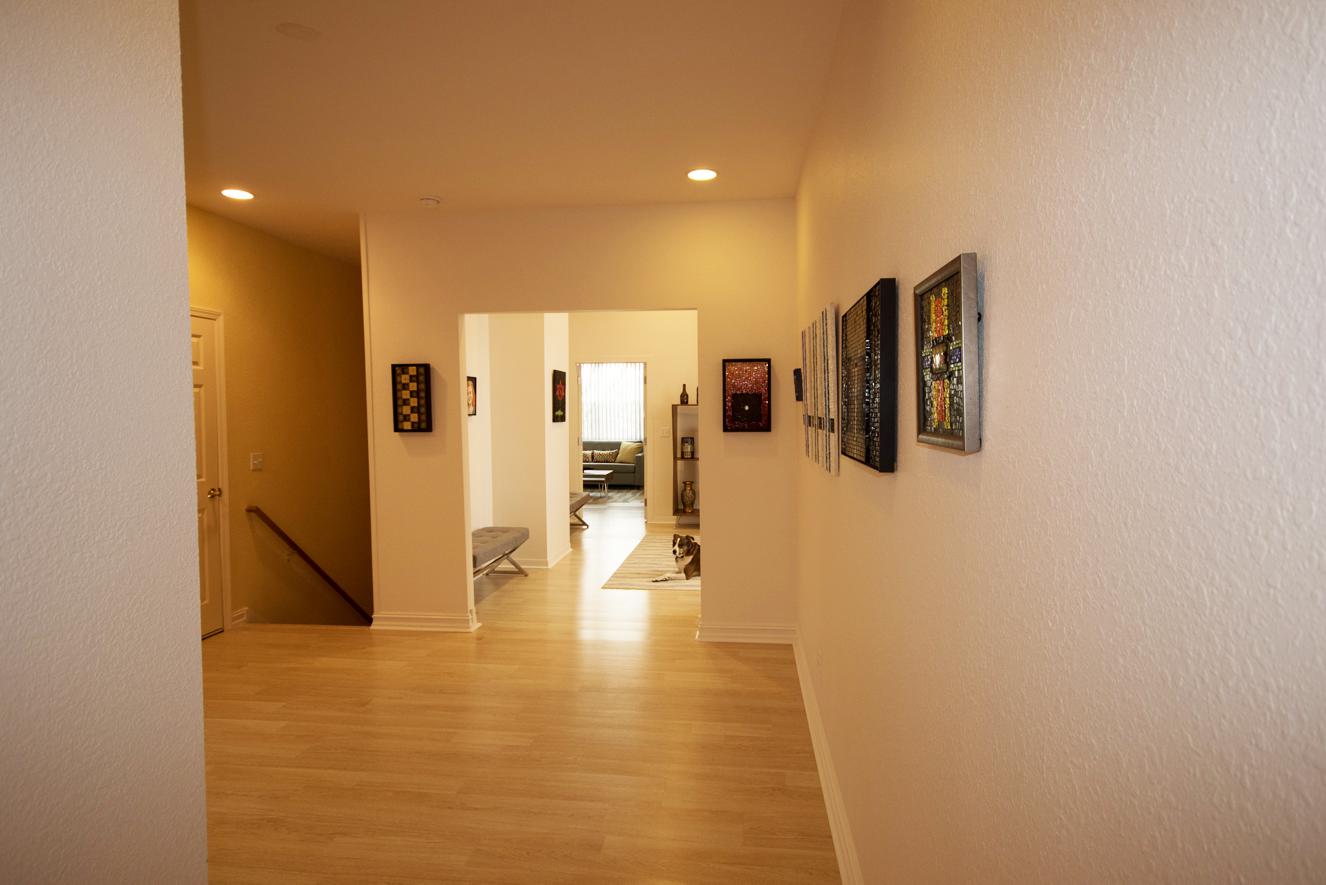
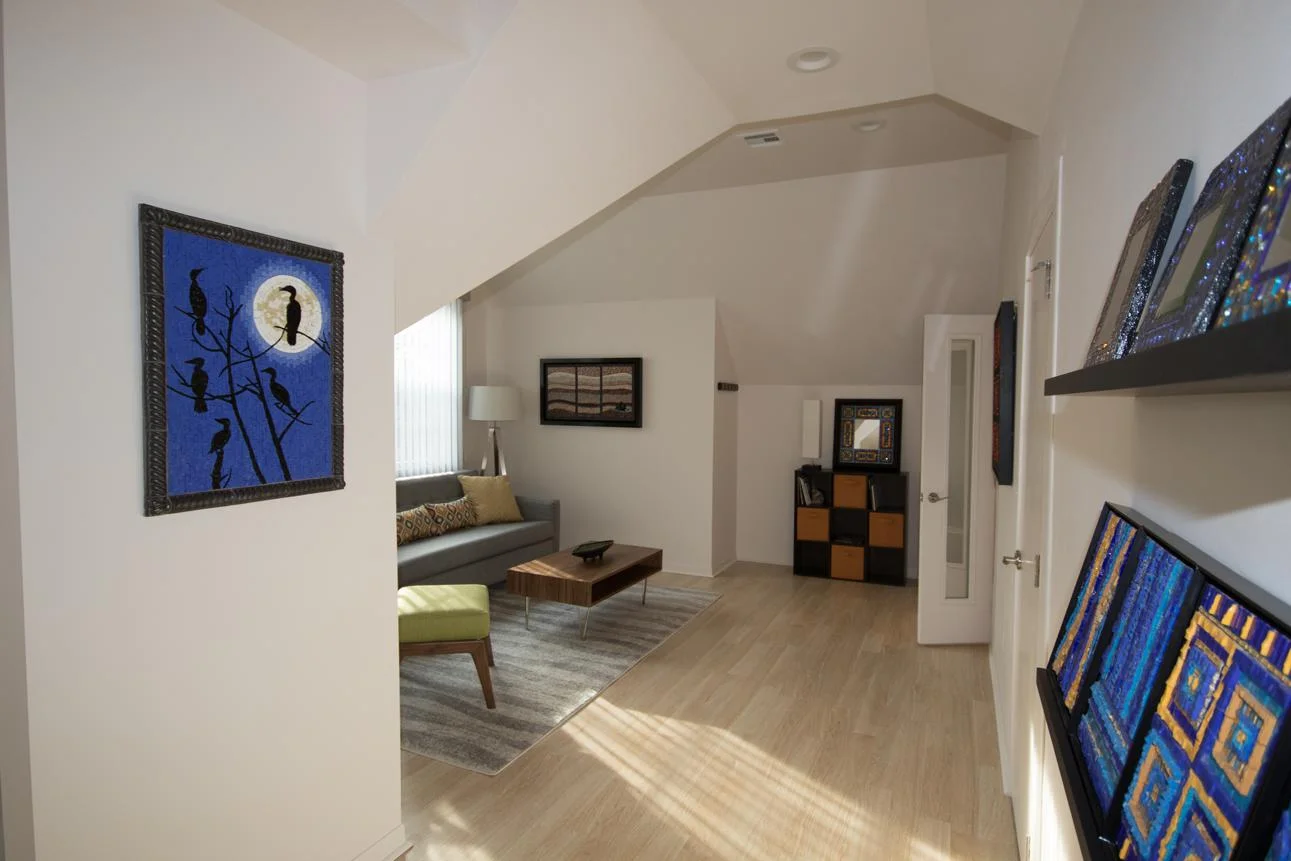
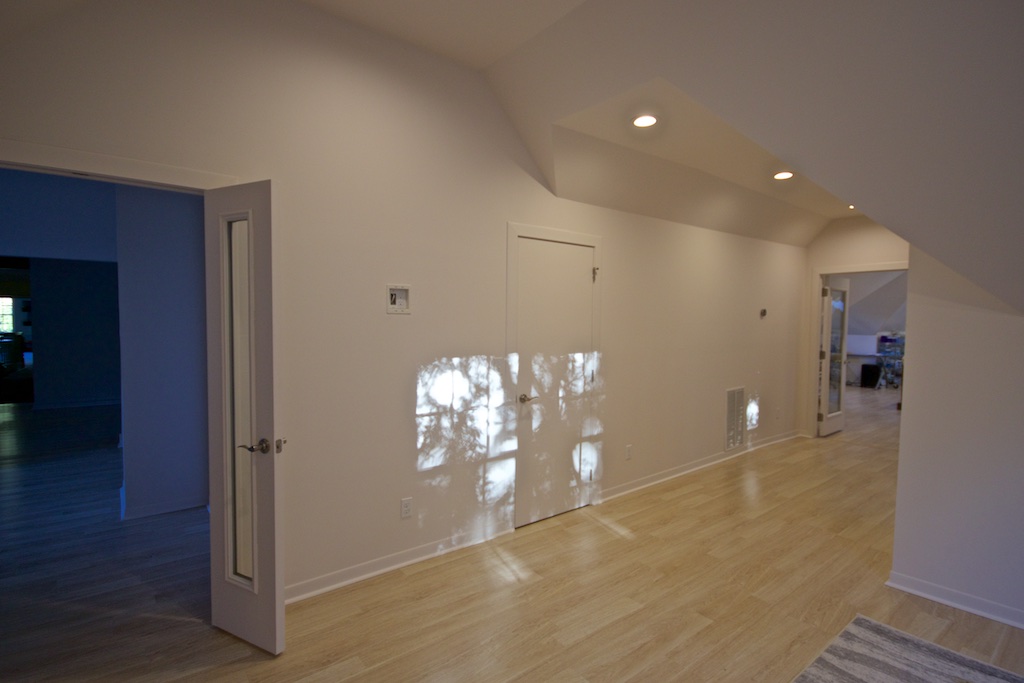
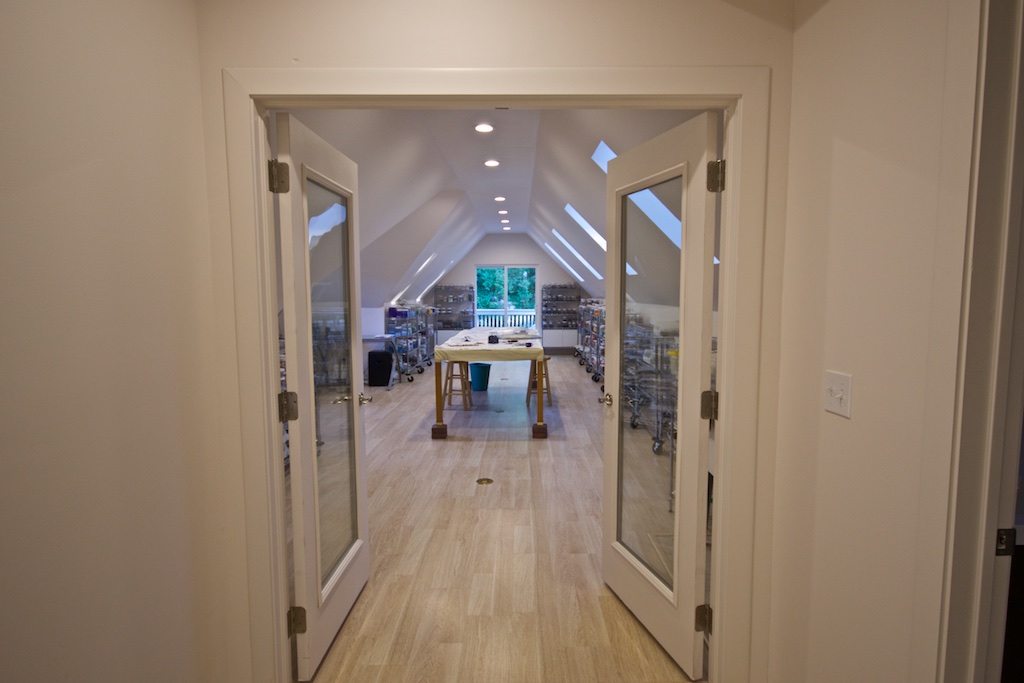
Now! The entry to the studio wing.

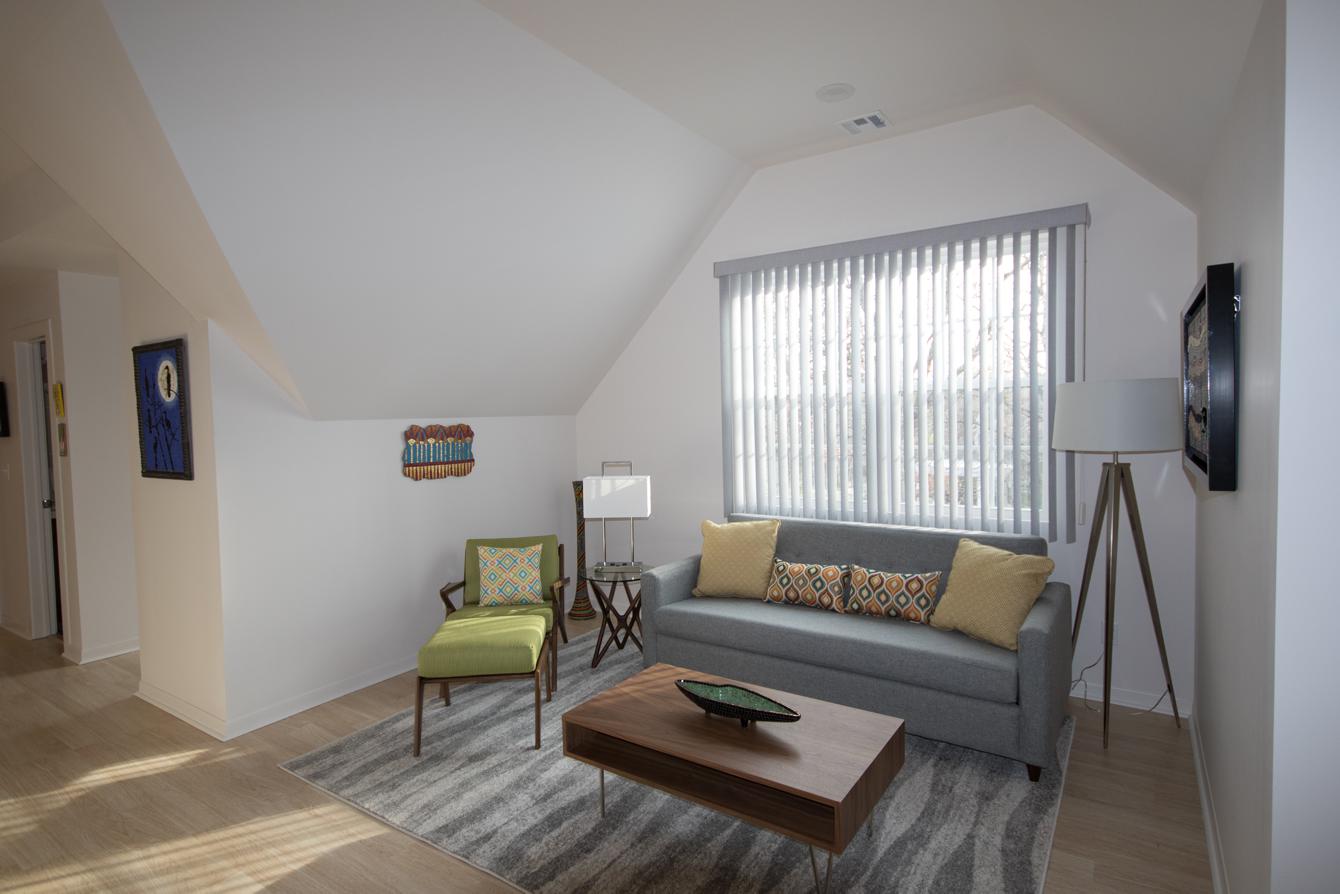
Around the corner, where the bedroom was, is a small gallery and sitting area.

Standing behind that orange chair in the previous pic.

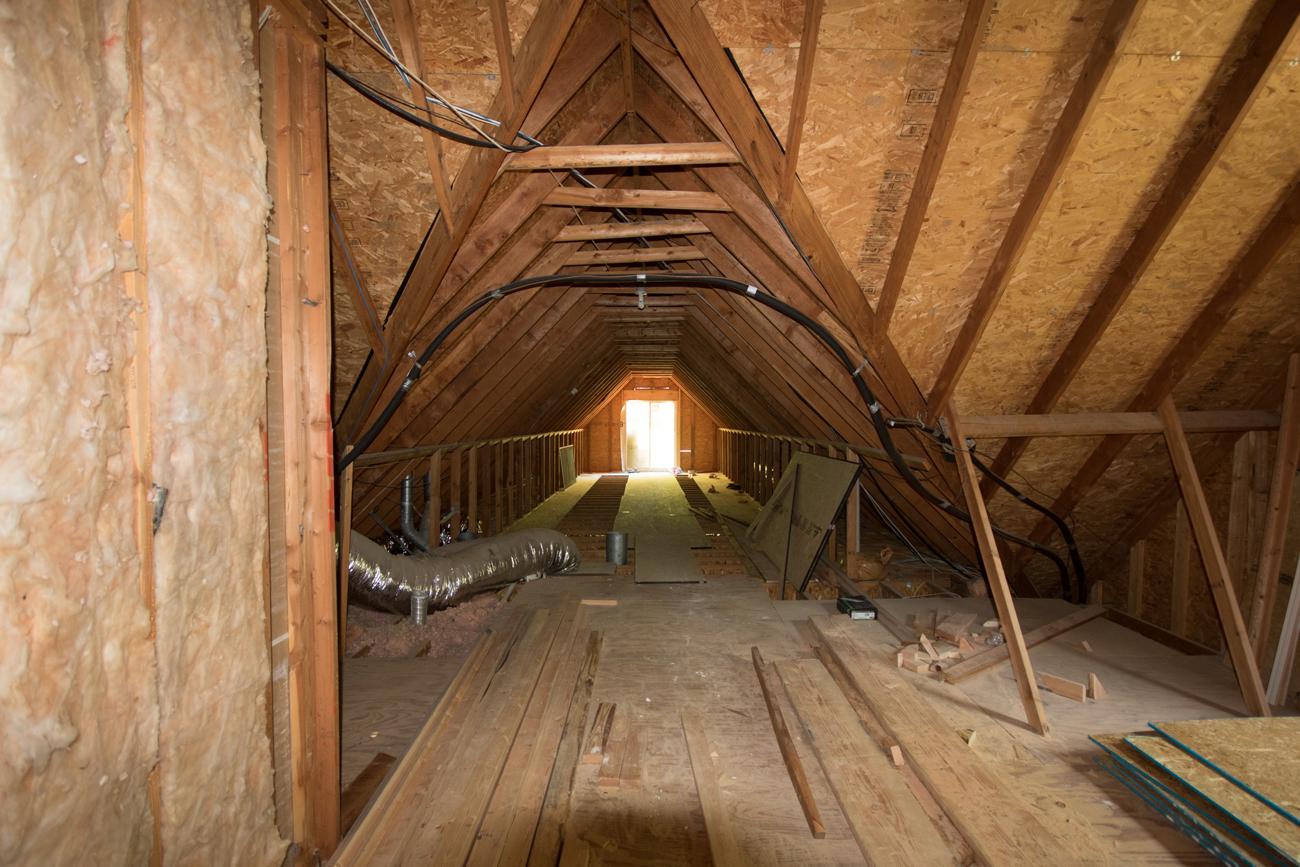
Construction has just begun: At the attic doorway, looking into the unfinished attic space.
Inside the studio wing, looking toward the double window that was a single window in the previous photo.
Just after construction began: Two closets on either side of the dormer window are taking shape. The attic door to the hall is off to the extreme right.
Dormer window area now.
From over in front of the dormer window.
Looking down over the garage, and the single window that was there has been replaced with a sliding glass door.
Looking down over the garage, which is now my studio.
From in front of the double window, with studio to the right.

Looking back into the attic from the sliding glass door at the end of the garage.

Now!
From just before entering my studio, my little kitchen. That shelf in the corner awaits a small microwave.
As far as future plans? There is a chance that my studio will be included in the next OVAC Tulsa Studio Tour. I've yet to hear for certain, but I hope that works out. I would also like to have an open house sometime this year. And once I've had the studio all to myself for awhile, I plan to organize a class or two. My space could easily accommodate a nice number of students.
So many plans! For now, I'll just make another bottle.
(2017) Purple and Silver Bottle 14" x 4.25" | 36 cm x 11 cm. Mirror and Van Gogh glass.
Just one more post for the day! As I mentioned a couple of posts ago, I decided to spend some time mosaicking a few bottles that I have collected over the years. I may move on from there and take care of a few other decorative items that I have acquired.
I just finished this bottle a few days ago, using a nicely shaped Italian Pinot Grigio bottle—the pinot was delicious, by the way.
The palette is not a fave of mine; I chose it in an effort to force myself to try something that I would normally not choose. Purple is okay, but purple and silver does not do a lot for me; the contrast is so strong.
However, the palette did grow a bit on me over time. I do like the shape of the bottle, and the overall pattern, and plan on another go at another of the same type of bottle that I have—and the pinot was still delicious.
Meanwhile, I've started another bottle, with a different palette that is more pleasing to me, and one that I have not done before. The bottle is from a Franciacorta—an Italian sparkling wine made in the traditional champagne method (not Prosecco)—which I found by chance last fall. It is not easy to find such a sparkler here in Oklahoma. The bottle has a nice shape to it.
I've got several more bottles that I plan to mosaic. I may not be ready to tackle some fine art until the second half of the year. Too bad. So sad.
I've been pondering the idea of having a storefront for non-fine art for some time, and I've decided to give it a go. I've been working on it, off and on, for the last few weeks. Yes, I have considered an Etsy site but, for now, I'm going to try having a purchase option from my own website, which Squarespace does quite nicely.
Decorative items, note cards, books, etc., will be available. I've been working on a new book—Studio Book— which should be published in the next few weeks (I'll share a bit about it in an upcoming post), and I would also like to sell Edible Bits & Pleasing Pieces via my storefront.
I just love a new project!
(2016) Self Portrait 32" x 32" | 81 cm x 81 cm. Marble, mosaic gold, smalti, Swarovski crystals
Self Portrait is now framed and I have taken the best photos of it that I am capable of taking. It's very tricky to photograph well, at least for someone of my modest photography skill. The gold against all the black marble—well, I did my best.
What's with the Self Portrait title, a few have asked. I'm not exactly sure. Something about the lines—I love line—and how it seems all straight and contained and organized and maybe boring from a distance. But, from closer up, you can see that the background is not really all one color, and there are specs of gold and color and sparkle here and there. And from different perspectives, you see something else—still lines, but more dimension.
Is this the way I see myself or the way that I imagine other people see me? I'm not exactly sure about that either.
Retro Dish (2017) 20.5 l x 6.5 w x 3.5 h. Vitreous glass, mosaic gold
I had forgotten how much I enjoy decorative mosaicking! This dish was just plain fun! Well, it was a bit tricky around the hairpin-curved ends, but still so enjoyable. No, it was not a big challenge, which made it a very low-stress project.
It also felt good to finally deal with an object that I acquired so long ago. Over the years, I have acquired a few too many objects, with the intention to mosaic them—someday. Interesting liquor bottles, for example, are always tempting. I also have a few boxes, a couple of trays, and other miscellaneous items.
It seems that I am not ready to take on making art. Making art is hard for me. It's not that I want to wimp out, but I do need to be ready, strong, and balanced enough to be able to stay in right relationship with my art-making. I may not be there yet.
So, I've decided to spend some time doing decorative work, and make use of my inventory of objects-in-waiting. Even just the thought of this delights me. Sure, avoidance might be at play, but while I figure that out, I'll make a few beautiful things.
Retro Dish. Approx. 21" l x 7" w x 5" h.
I've done a bit of research on this Royal Haegar ceramic dish, but have yet to identify its time period. It looks retro to me, so I'm calling it Retro Dish. I bought this dish for a couple of bucks at an estate sale many years ago, and recently decided to give it a face lift, via mosaic.
As can be seen, I'm making progress on the black base, after using copper gold strips for the rim. I decided to mosaic one row of black on the inside top edge, as well.
The rim, and the top rows on either side of the rim, were very tricky. The first few rows of black on the outside of the dish were also quite challenging—especially around the sharp curves at the ends—due to the shape of the dish. I am currently working on row 7, moving toward the center of the dish on its bottom, and it is more manageable. The top photo shows my progress at 4 rows.
Fullness (1999-?) 5' x 3' | 152 cm x 91 cm. Vitreous, minerals, mother of pearl, slate, glass. The top, bottom, and right borders are cut off in the photo, as the piece was just too big for me to get it all at this time.
Around 18 years ago, when I barely knew what I was doing, mosaically speaking, I decided to make something big!
I also wanted to use some stones, and the only ones that I could get my hands on were polished stones from a metaphysical shop in town.
I quite impulsively jumped in on this 5' x 3' piece of Hardi-backer and created a border out of small slate tiles, mother of peal beads, and ceramic decorative strips.
Then I started mosaicking my partially thought-through design, leaving a whole lot of unthought-through background. I made it to the hair and lacked both the skill and the confidence to go forward. As for hanging hardware, I would just worry about that later.
Well, what do you do with a 5' x 3' abandoned mosaic? I liked the original idea of the piece, and friends and family kept encouraging me to finish it, however I had no appetite for finishing it and did not know what to do with it either. So, I just stored it away and out of sight.
Jump to late 2016 and my move into my new studio, which called for serious organizing and decision-making about this albatross. Once I had my new worktables in my studio, I decided that I would keep the mosaic out where I could live with it and make a decision about it once and for all.
I realized that I could not move forward on it until I figured out the hanging hardware, as well as a support frame for the back of it. Then, I would need to work out how to finish it. After a few weeks, I started figuring things out, and decided that it would be a great challenge to finish it. And that is what I will be doing for the next few weeks.
I've already added support framework to the back and installed the hanging hardware. Also, those copper gold squiggles in the hair area are new and I hope to finish the hair in the next week or so. Then, on to the massive background! I will try to resist the temptation to rework anything that is already done, but it won't be easy. That apostrophe-shaped deal in the moon really makes me a little crazy.
Finally! Most of my new furniture for the studio wing is being delivered next week! A sofa, coffee table, chair and ottoman for the living area, and a chair and ottoman for my studio office area. I ordered these pieces Aug. 30 of 2016 from Joybird—I really love their furniture—but it has taken a bit too long. I'll have to wait a couple or a few more weeks for a 3-piece bookcase; one of the pieces is for the studio wing, the other two will serve as a room divider in our game room.
Now that my decor is filling out, I got to thinking about smaller things, like pillows and throws and what to put on the coffee table? Books, of course—mosaic books! But I could use a couple of other things for various surfaces. Then I remembered the interesting dish?—not sure what to call it—above that I found over 15 years ago at an estate sale. It was not the colors that attracted me, but the interesting shape. I think this will work beautifully with my mid-century, retro-modern furniture.
At right are the swatches for the sofa, which is gray, and the chair and ottoman. So, I'm going to finally mosaic this ceramic dish with vitreous glass in black for the bottom and feet, that chartreusey-green metallic, that is actually fairly translucent, and maybe some copper gold for the top edge. I may add some black on the interior as well. Nothing fancy—just a makeover!

On the Horizon, detail
Feeling horribly puny over the holidays with a very stubborn sinus infection, I dabbled away on a little mosaic. I was inspired by my commission idea board samples, and also by a transitional experience that a friend of mine is going through.
Here it is, in a digitally created frame like the one in which it will be framed.
On the Horizon (2017) 8.5" x 5.5" | 22cm x 14cm. Marble, porcelain, vitreous, Van Gogh glass, mosaic gold, contorno, amethyst. pyrite
Happy New Year everyone— may we all meet peace on the 2017 horizon!
Three examples, approx. 9" x 6" each, to illustrate possibilities for a residential commission. The pieces are not glued down so the work looks a bit wobbly and not terribly refined. Each example has some pyrite—the darkish, grayish nuggets—but the camera did not capture the sparkle. Oh yes, I've been having fun!
I'm currently working with someone on a possible residential commission. She has a niche, measuring about 4' x 2' or 3.5' x 2' or 4' x 2.5'—something like that. The niche, in the entry foyer just to the right, is on a concave wall but the niche itself is not curved on the inside—it's like a box set into a curved wall. We are exploring the idea of a mosaic for the back wall of the niche, but a mosaic that is portable and can be removed.
The homeowner is not very familiar with mosaic and admits that her husband is more the art person in the family. She came by my studio a couple of Fridays ago to see some of my work and toss around some ideas. She had no idea what she wanted for the space, but I was able to glean some ideas about her preferences from our visit.
I'm not sure that she will conclude that my work, or even a mosaic, is right for her home, but she did want to move forward and see what I could come up with. I've got a design idea and have prepared some examples to help her better visualize the materials and what I have in mind. She will be by Friday morning to take a look.
Even if she does not like it, I actually love what I've come up with and just might have my next project(s) in the works!
I drug this old project out of the closet almost 2 years ago. Hold on, a bit of history may be in order first. About 7 years ago, I was not even 1/8th of the way through this project before I realized that I was on the wrong track. So I did what any normal person would do in such a situation and I got busy with other things. However, not ready to abandon the original idea, I just put the piece away in a closet.
Self Portrait (2016) 30" x 30" | 76cm x 76cm. Marble, mosaic gold, smalti, Swarovski crystal
A couple+ years ago, I was cleaning my studio and deciding what unfinished projects to give up on and which ones to consider finishing. I decided to give this project another go and rethought it. I came up with a strategy that would better support the original concept, and also give me an opportunity to improve my hammer-cutting skill. I tested out the idea on a small corner and decided that it was a good way to go.
Long story short: Got into a bad place with my work, took sabbatical, sabbatical turned into quasi-sabbatical which allowed finishing old stuff but not trying new stuff, decided to plug away on this project while new studio renovation was underway, halted work on project—then 1/2 finished—for renovation, resumed work a few months ago after moving into new studio, finally finished it! So, I guess you could say that this has been a 10-year project.
Well, of course, I am not quite sure how much I do or don't like it, although I think the side perspective is pretty cool!. By the time I resumed work on it in the new studio, I was wishing that I had decided on turquoise instead of red but, alas, that ship had sailed, so to speak. The main thing, however, is that I finished it! And I have greatly improved my hammer-cutting skill. So, good deal. Very good deal! And my first project finished in my new studio!
I've yet to frame it but here it is. Please forgive the photo quality.
A dear friend of mine sent me a photo this morning, a photo which took me back in time.
So many years ago, Carole wanted me to make an elephant mosaic for a triptych frame that she had bought. This had to be over 15 years ago—certainly in my early mosaic days.
The first pic shows the 3 small panels in the frame. The other pic, which my friend just sent me this morning, shows the panels, minus the frame, as they hang in her new place in Houston. As I recall, I mosaicked the original masonite backing panels that came with the frame.
It's interesting to look at old work.

Self Portrait. 30" x 30" Marble, mosaic gold, smalti, crystal beads.
Dabbling, that's what I am doing. Sticking my toe in the mosaic water. Easing in.
Are you the type to just jump in the pool, or the type to go in from the steps, acclimating slowing? When it comes to swimming pools, I'm the go-in-slowly-from-the-steps type. In my mosaic life, however, I have been more the jump-right-in type. That served me well in the early years. Now, however, after time away from the work, while simultaneously being invested in the interior analysis of relationship to work, I'm committed to a slower, more thoughtful discipline.
That discipline is aimed at keeping in check both a penchant for taking myself too seriously and an obsessive precision that crosses over into perfectionism and hurt hands, as well as being observant of anything else that leads me to lose sight of the value of my experience of creating.
Well, there's a lot going on there but I am optimistic that it's not quite as heavy a lift as I just made it sound. I'm actually feeling good about getting back to work and believe that I am up to the challenge of such discipline.
As I dabble in this Sunday morning light, on an unfinished mosaic that I've committed to finishing, I just love the way the light, through a skylight in my new studio, is reflecting off the surface of the mosaic. As much as I love this perspective on the work, this beautiful light is also hampering my ability to work.
It's good to have the light shine on a process for the perspective that it offers. But that does not mean that so much light is what the process always needs, does it? Well, I did anticipate the problem of the morning light coming through the skylights, which is why I have ordered solar shades which will be installed next week. This should help a lot for the short time that the sun requires to rise above my roof.
With summer travels and home renovation, things have been incredibly busy the past few months. But the renovation is mostly finished and my new studio is operational. If you would like to see my new space, check out this blog post.
After a few very small mosaic tasks, I'm almost ready to rejoin the mosaic world and focus on finishing a couple of works. My sabbatical turned quasi-sabbatical and then back to full sabbatical during the renovation has been very good for me. This blog series, as well, has been helpful, and I feel it will be even more helpful if I continue it.
So, we left off in about 2006 with the idea of essential mosaic, or work that is uniquely mosaic. My first introduction to the concept was by Gary Drostle, who described it as work that would not be as successful in any other medium. I'm pondering a tighter qualification, that being work that can only be successful in mosaic. What do you think?
As the riddle of essential mosaic nagged at me, I attempted to chase it and began creating abstract mosaics and working with a variety of materials. I came to realize that I love line. And simplicity of design. And minimal color palette. And precision.
Simplicity of design and minimal color palette gave me a sense of space. Precision gave me a sense of ease, which actually sounds nonsensical as precision is not at all easy. But precision made things make sense, made the pieces make sense to each other—to meet on equal terms, made silence instead of noise. I still feel the same way today, although I now understand how precision is vulnerable to perfectionism.
In this time period, I was paying more attention to texture and was experimenting with dimension. I also began thinking in terms of works in series. Music To My Eyes was the first series, based on classical music forms and particular compositions in the form, as well as the use of mosaic gold to express movement.
Below are the first two in the series, Etude and Nocturne, 2007 and 2009, respectively

Mosaic gold is quite unique and extremely responsive to light. The texture and shadow inherent in hand-cut glass and stone are also unique to mosaic. But, are these essentially mosaic? Would they be as successful in any other medium?
Another series was called Vertical, but it is now called Lines. I was inspired by Brit Hammer's textural mosaics which were worked in lines, or as she referred to them, stripes. She worked mostly in glass and with a lot of color, and in a more relaxed style. Of course, I loved the idea of working linearly, but I did not want to copy her; I had to make it my own.
Below are two early pieces from the Lines series:
At left is the first piece in the series, Pulse, 2008. I was experimenting with a much wider range of materials and also with beads.
It was mostly easy to work monochromatically, in black, gray, and white, but combining the matte marble/stone vs the more highly saturated glass was a challenge that I would increasingly face as I tried to work with more color later on.
Also, I did not want it to look like stripes, which presented the biggest challenge, both technically and compositionally, in changing materials—going from smalti-sized tess to very small beads.
In retrospect, I think that the best thing about this series was that I worked with so many different materials and learned a lot about how they work together, and sometimes how they didn't.
At right is another in the Lines series from 2008, Rhythms: September. For this Rhythms sub-series, I made an 8" x 8" mosaic for each month of 2008 in this Lines style
What do you think? Did I make my own lines, distinctive from Brit Hammer's? And is this essentially mosaic? Would these pieces work in anything but mosaic?
During this time period of 2007 - 2009, I was working a lot and consciously trying to make art. I guess you could say that I was being an artist.
Over time, as I was being an artist, I was increasingly taking myself more seriously, which just might be at the heart of my struggle with being an artist. Part of the reason for this, I have come to realize, had to do with my increased awareness of and interaction with the—thanks to the internet— quickly expanding mosaic world.
That's enough for this post. I'll continue with around 2010 in the next post. Thank you for following!
Gosh, it's been some time since my last post, hasn't it! The summer has been busy, and here we are into fall already. Let me give an update on my new studio wing.
The studio is finished and ready for work, minus a bit of decor/furniture, and I'm getting settled in. I'm very happy with so many things about it and, although I'm not quite ready to really dig in on a new art project, I've got several things in the queue. More on that in a bit. For now, how 'bout some pics? I've included a few before pics because the transformation is just so dramatic.
Hint: Hover over the images for descriptions.
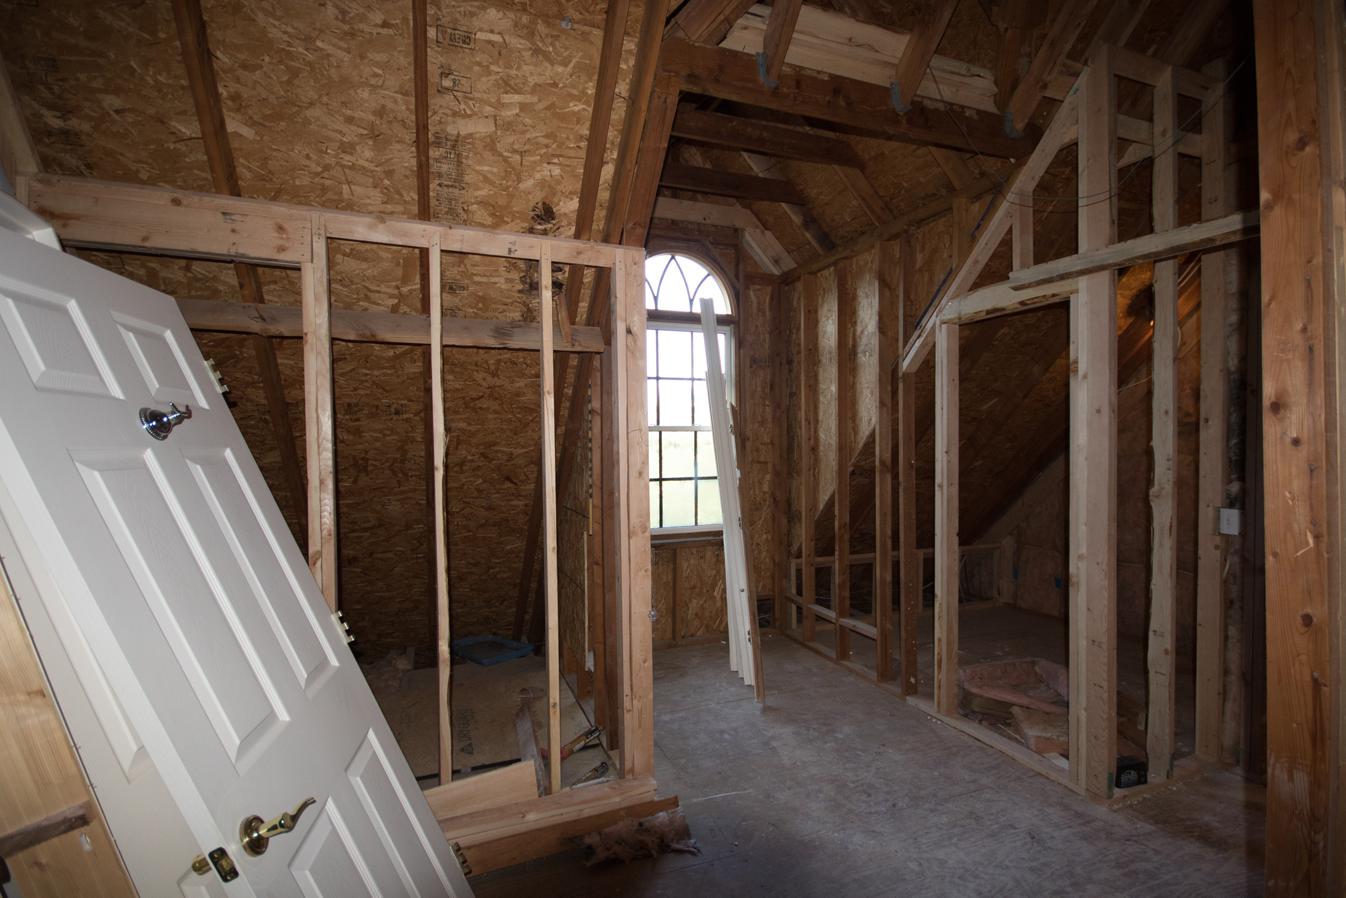
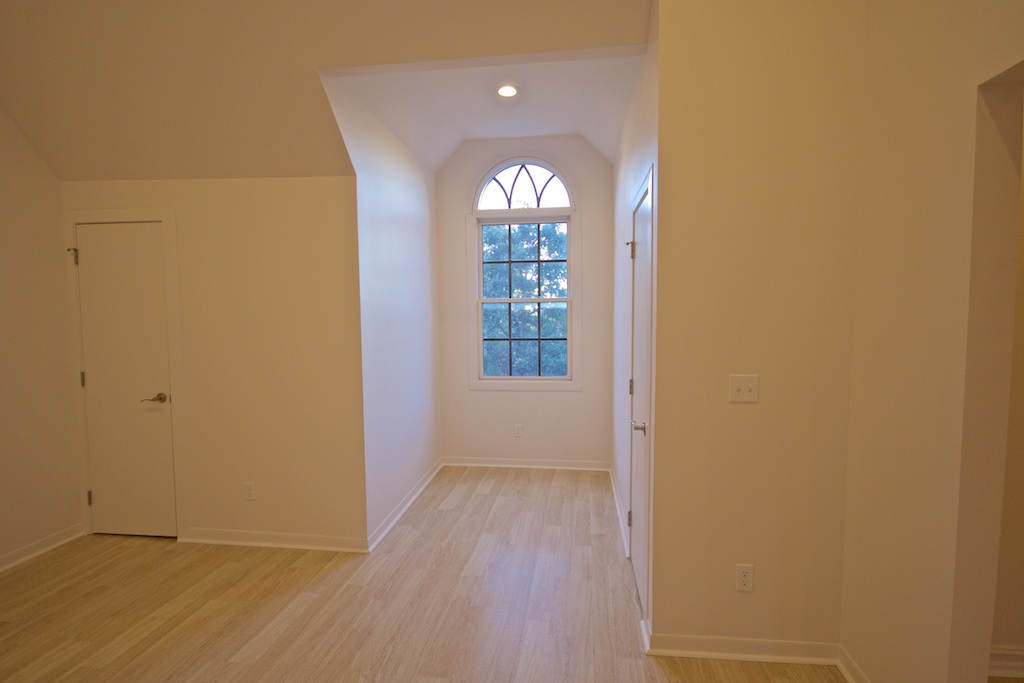
Before: Looking down the hall and into the unfinished attic; bedroom on left.
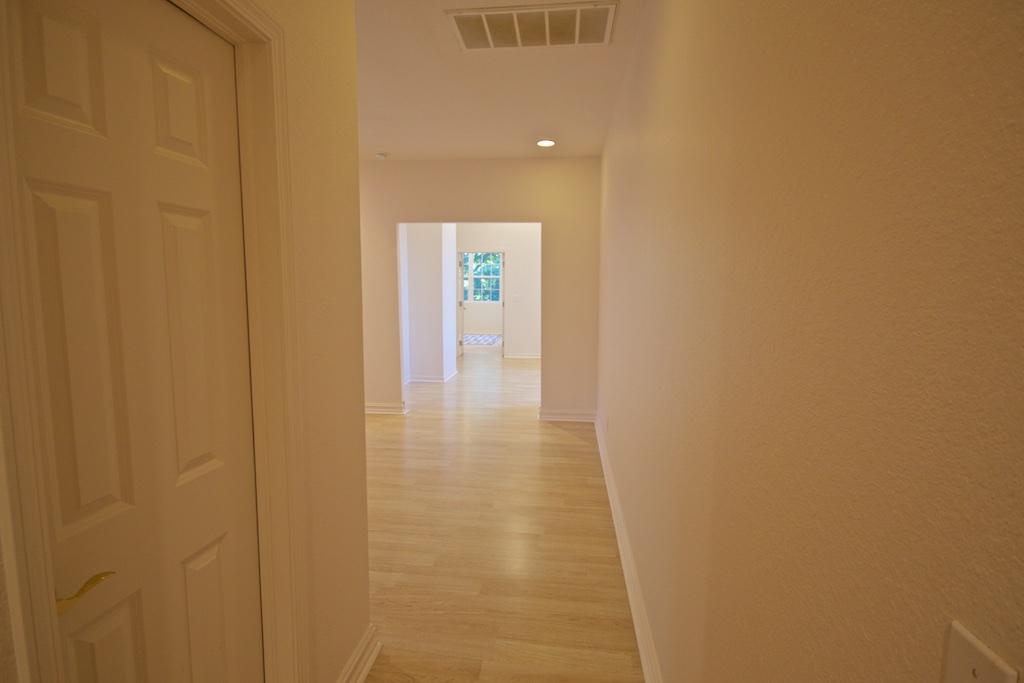
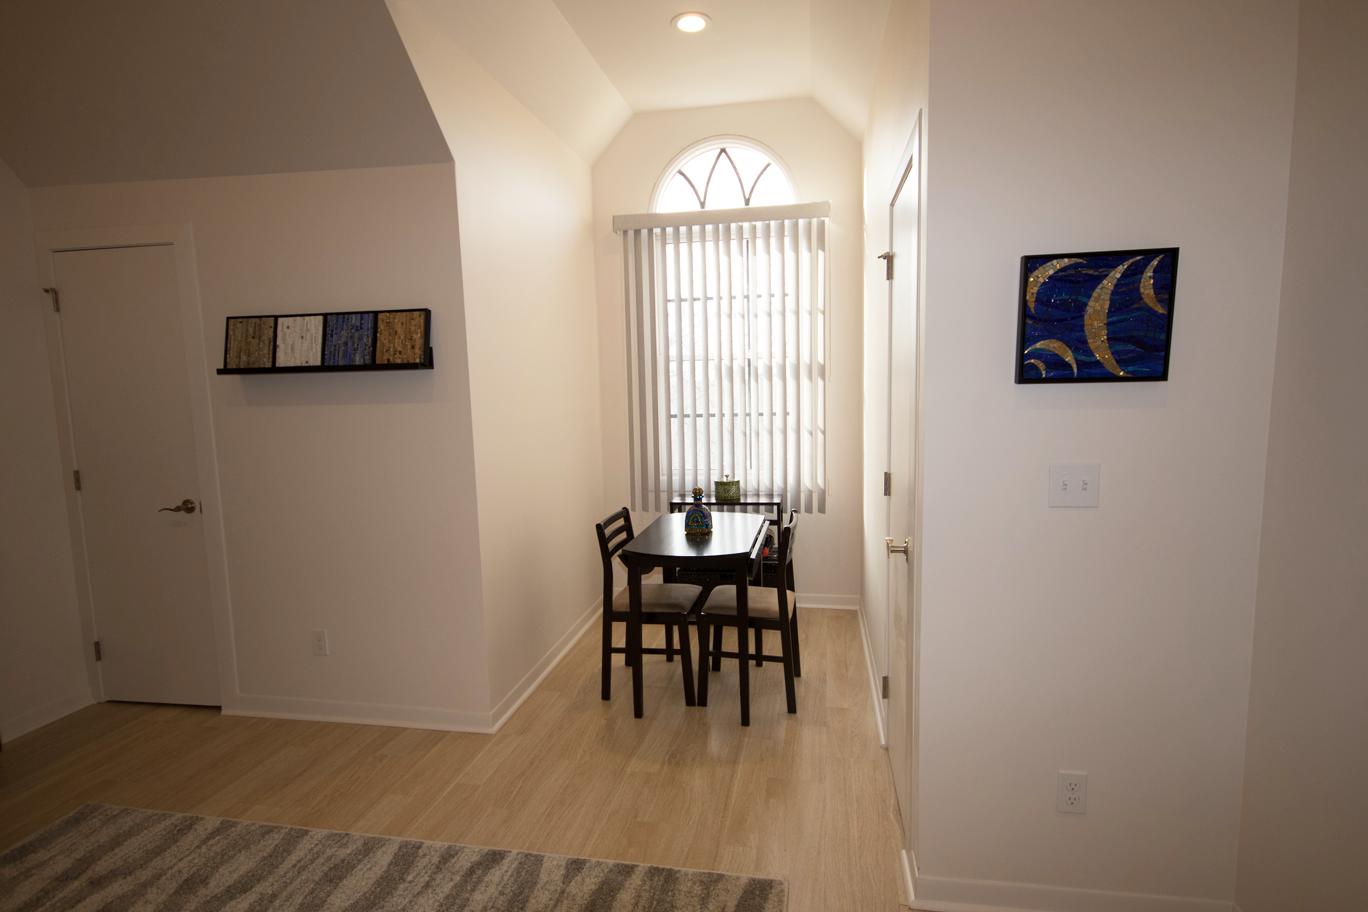
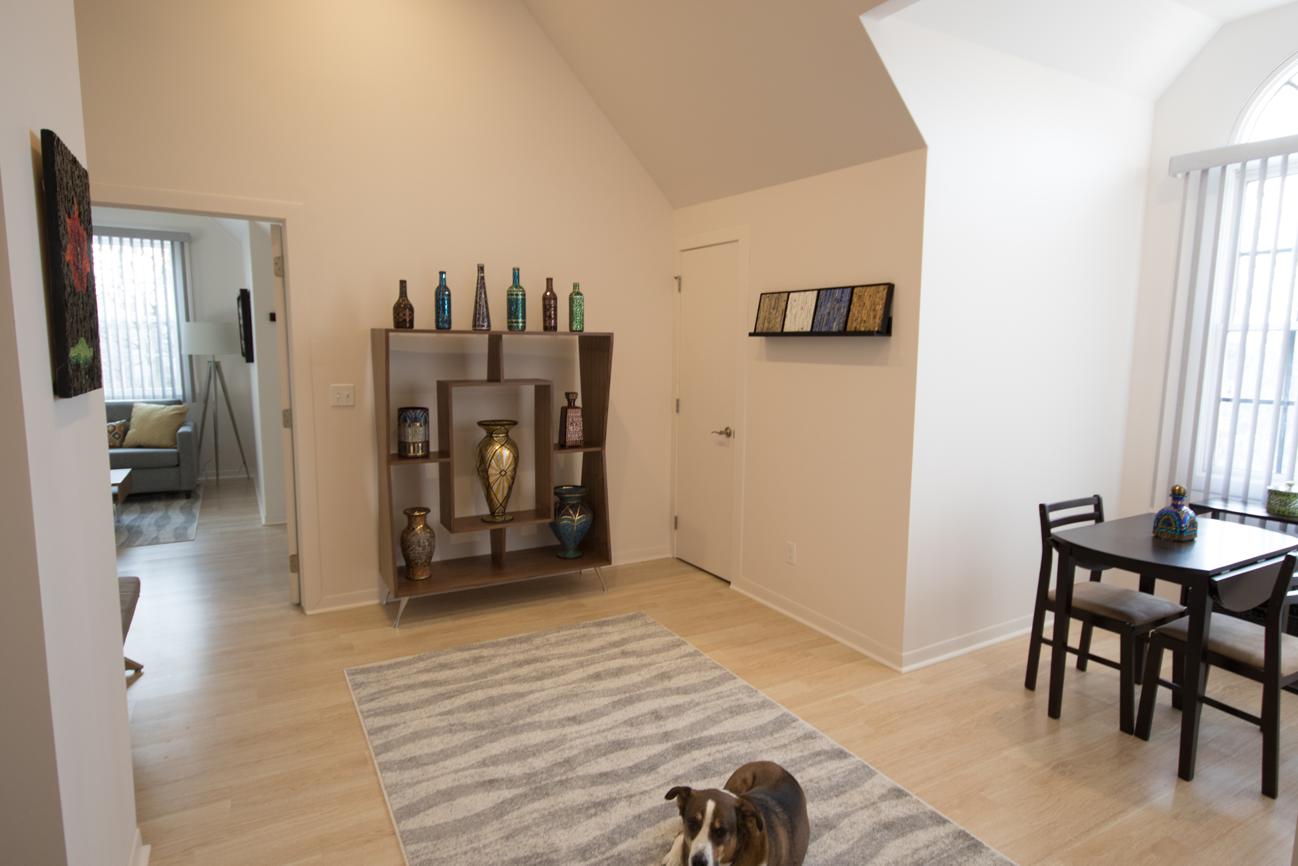
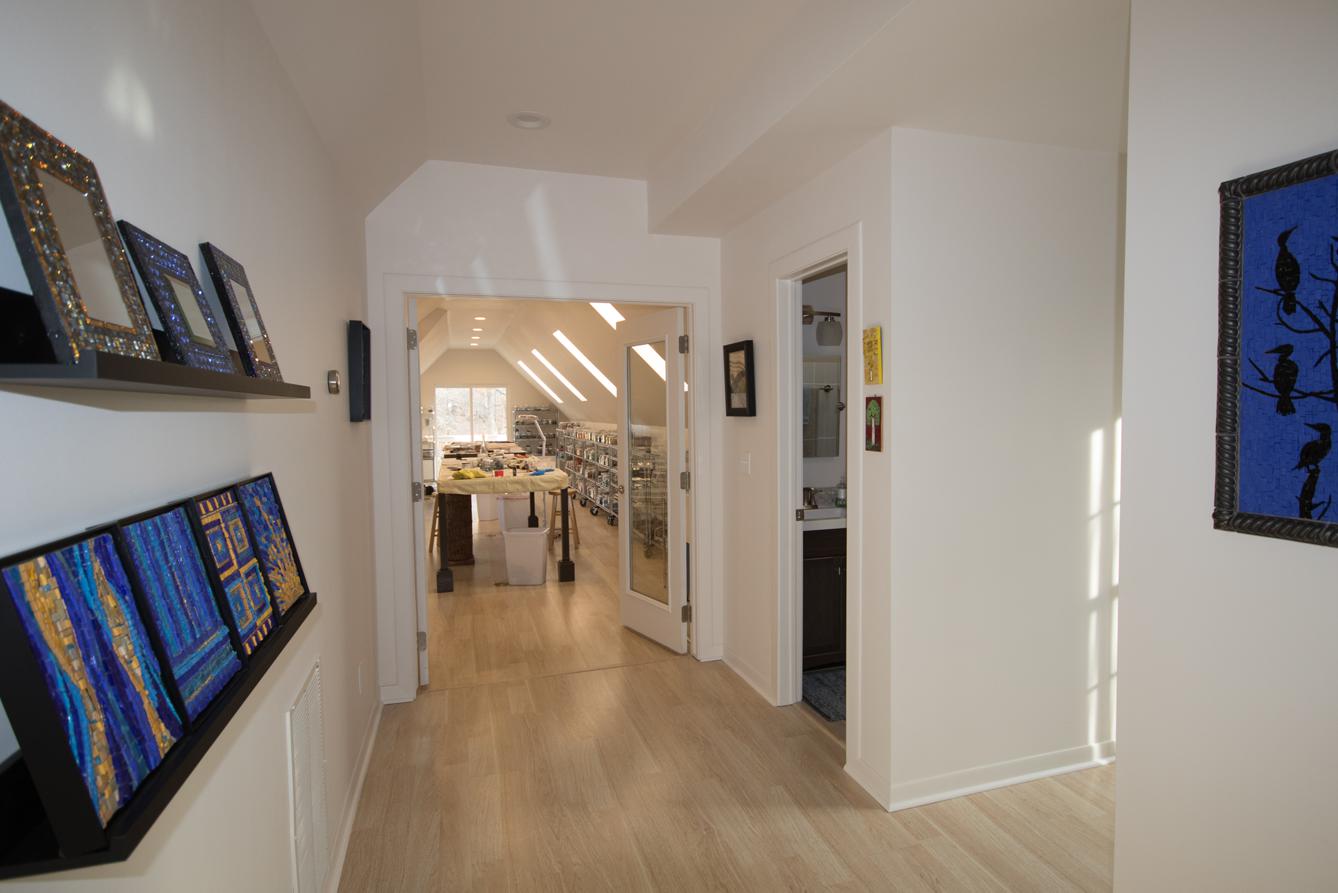
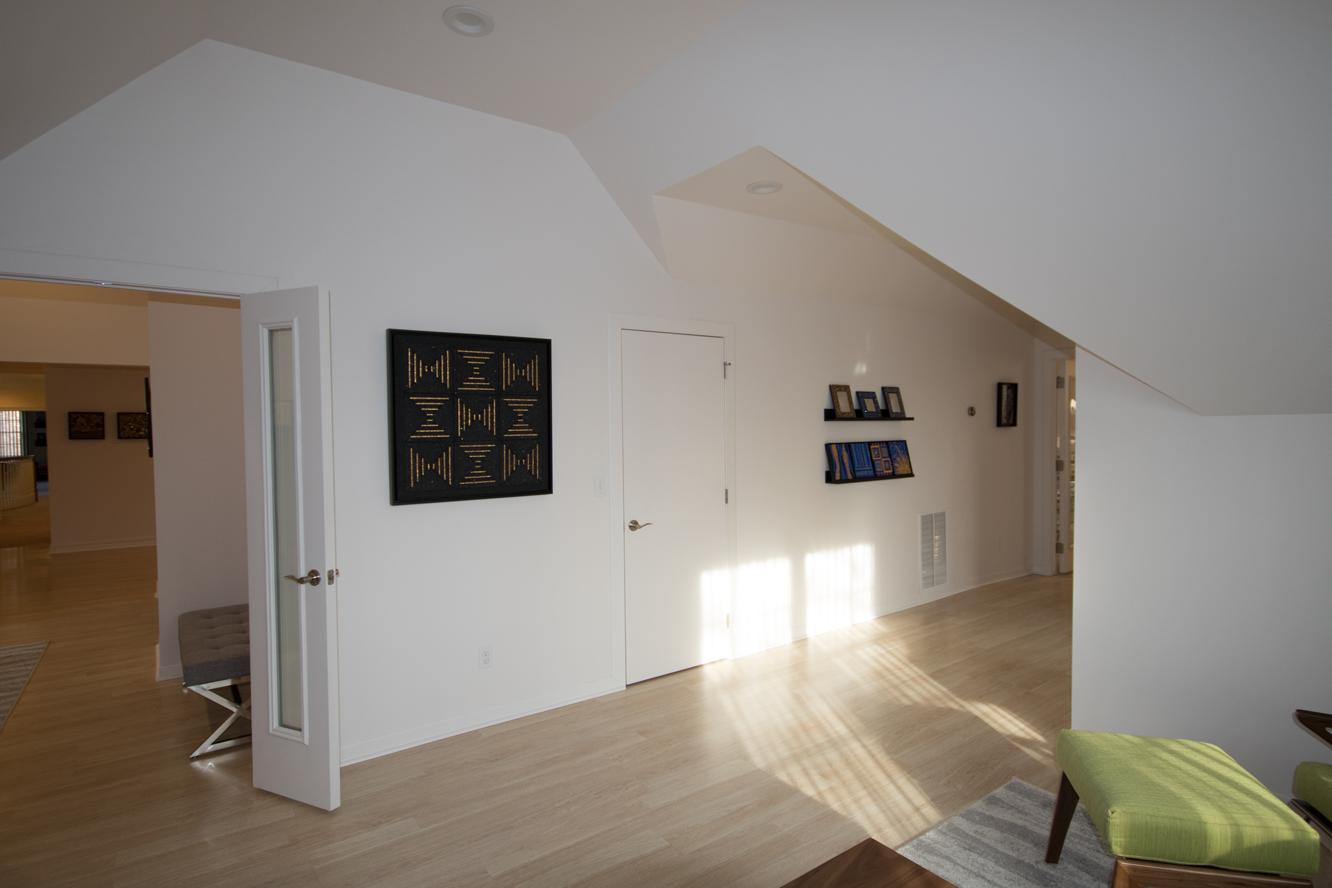
After: Looking into new studio wing. On left, what was a bedroom is now a large closet and an open gallery/sitting area around left corner.
Just around the corner and to the left. New area, was part of bedroom, will be a gallery/sitting area. Don't ask about that yellow stair wall. It's actually not that bright and is more of a straw, but still, don't ask.
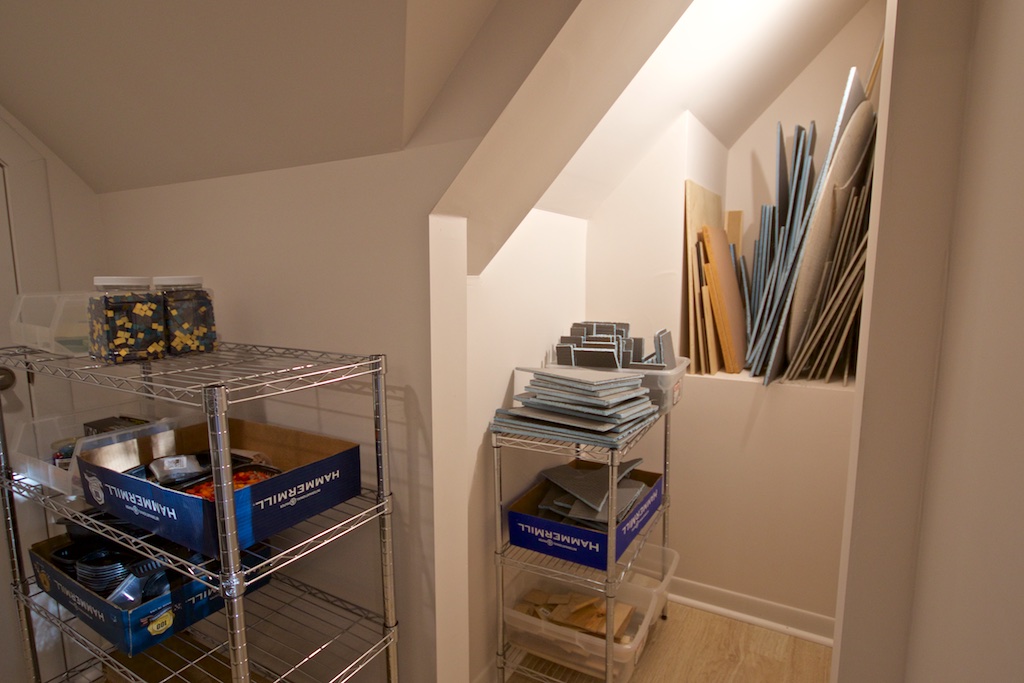
Just into the studio wing and to the right. Still working on finishing out this nice dormer window and formulating decor ideas. New closets on either side of window. Let me bore you with my closets.
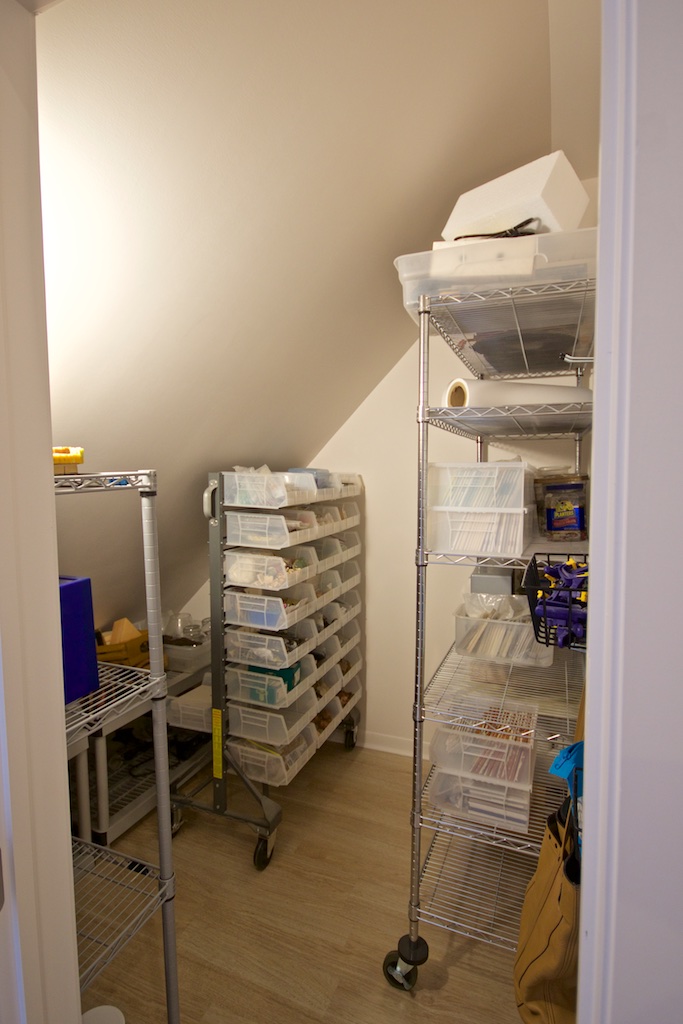
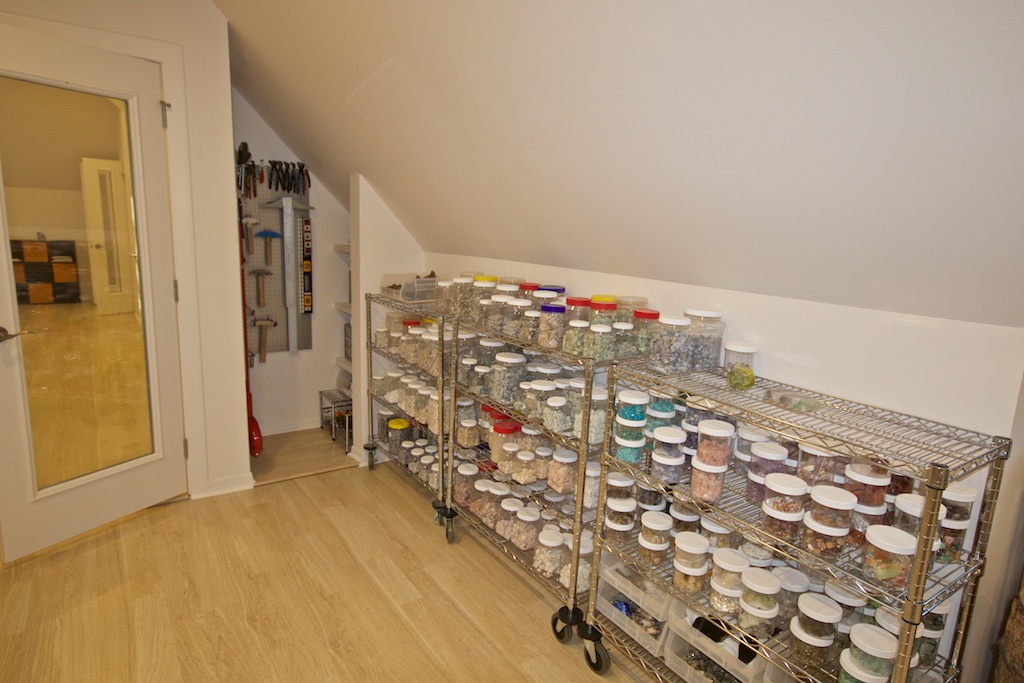
Great closet to the right of window. Ceramic, misc. stuff, stained glass, substrates, saws and some tools.

From inside the closet. I just love this closet!
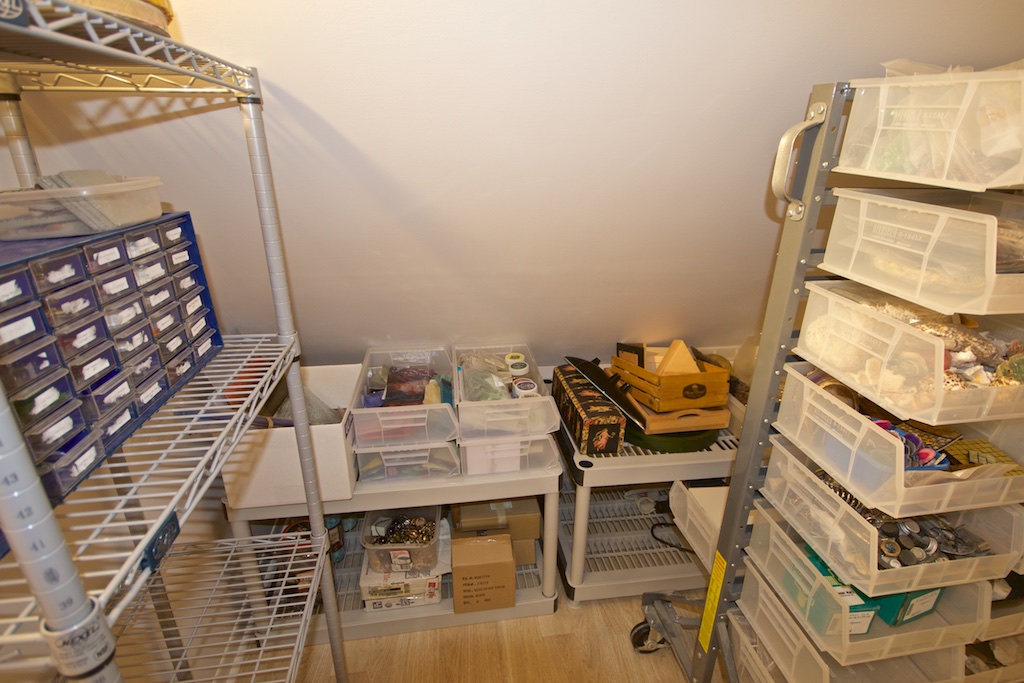
Inside the closet. I used parts of shelving to maximize storage along the low, angled wall.
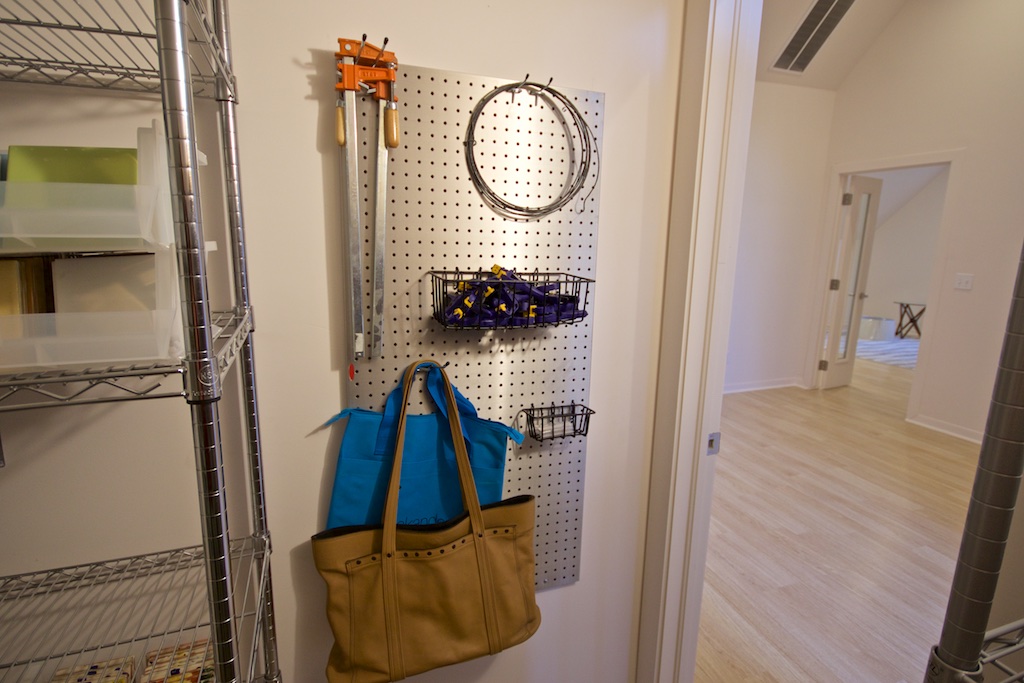
Still inside that same closet. Love my aluminum pegboard!
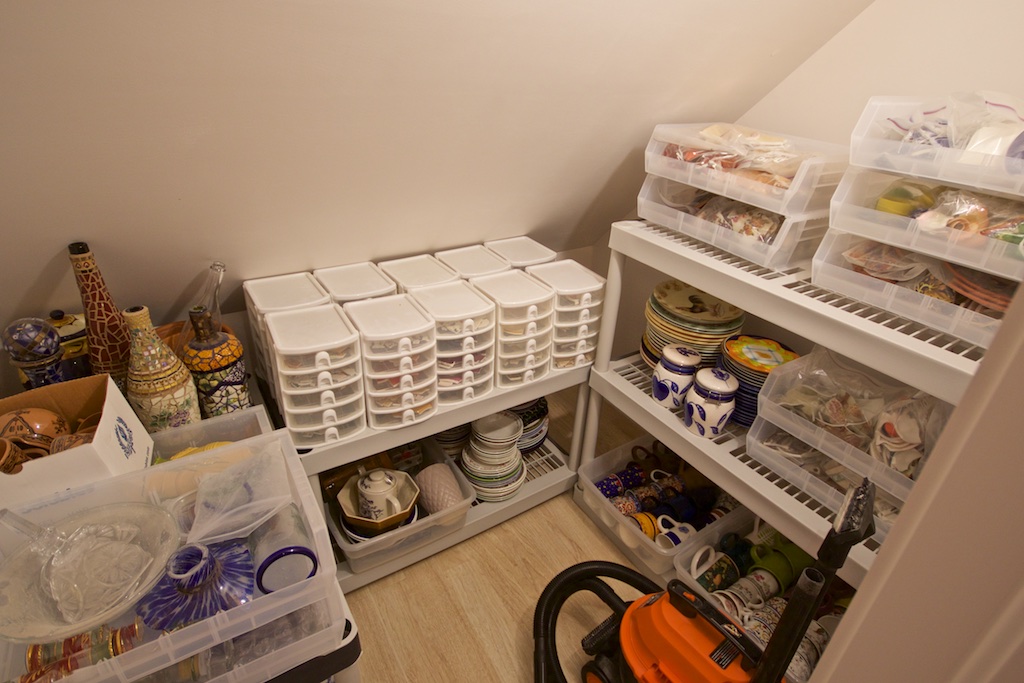
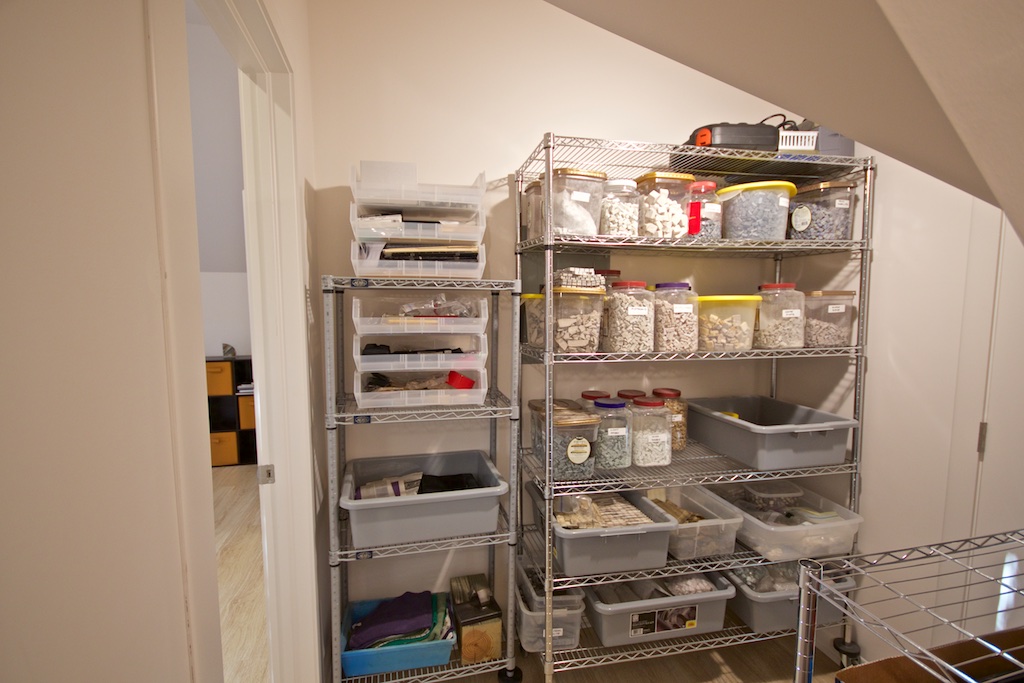
Smaller closet to left of window. All my dishes and ceramics—my Pique closet. I was really worried I would not have room for all of this stuff, and that I would just have to get rid of it. Whew! All in one little closet. And my shop vac to boot!
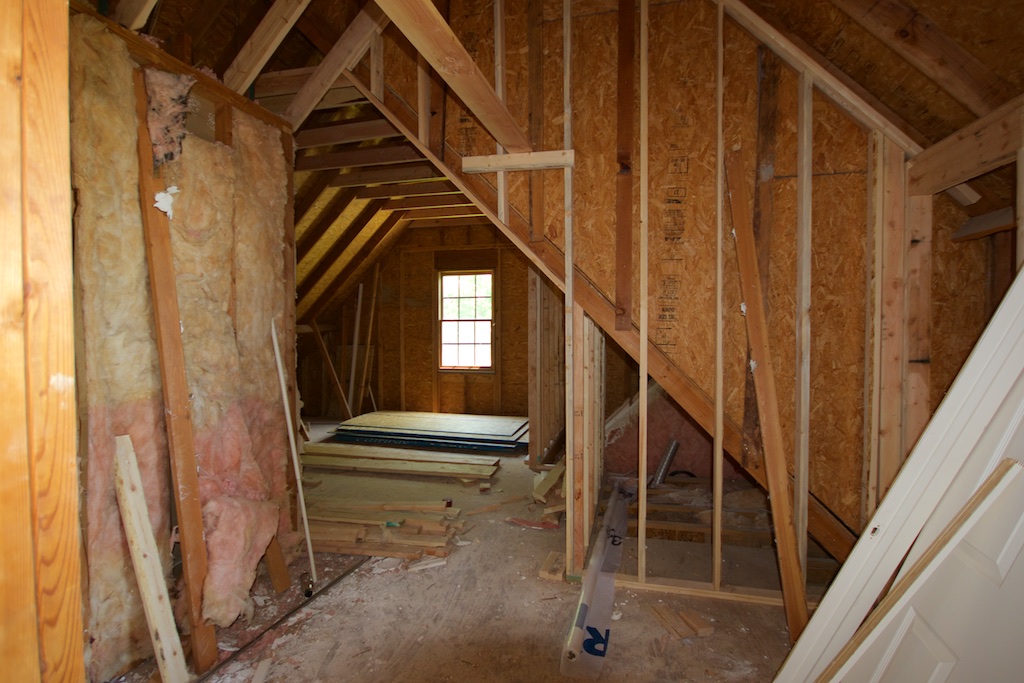
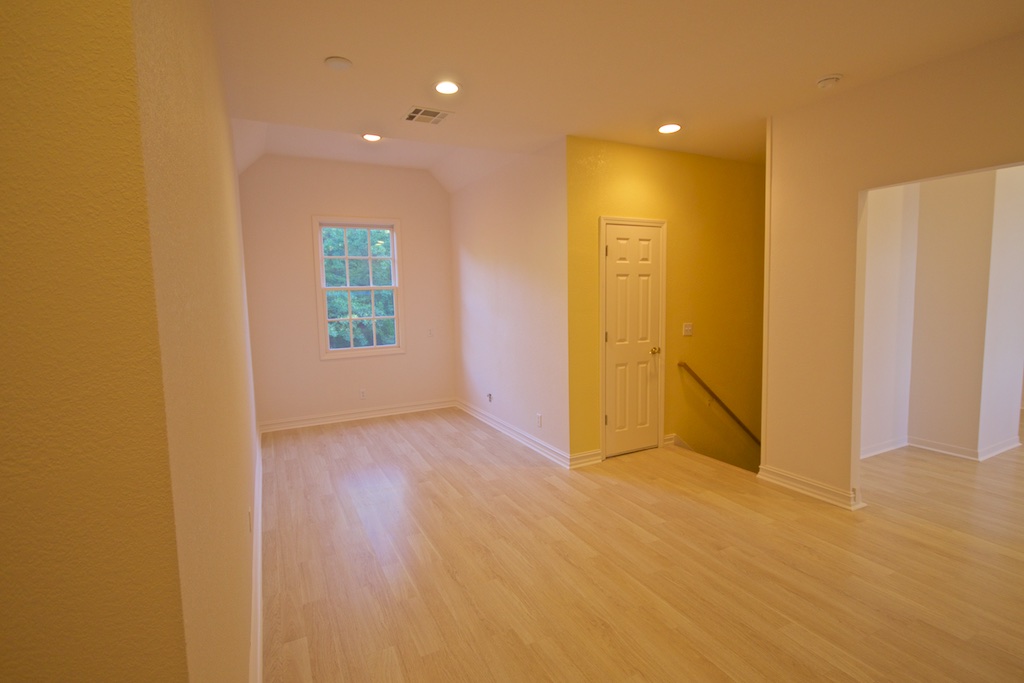
Before: Looking into attic area toward single east window. That dormer window is directly to the right.

Looking into the new living area/guest room—single window now a double— of the studio wing. Decor in progress.
Inside the studio living area/guest room with back to double window, let me show you yet another closet behind the center door—an awesome closet! Studio is to the right.
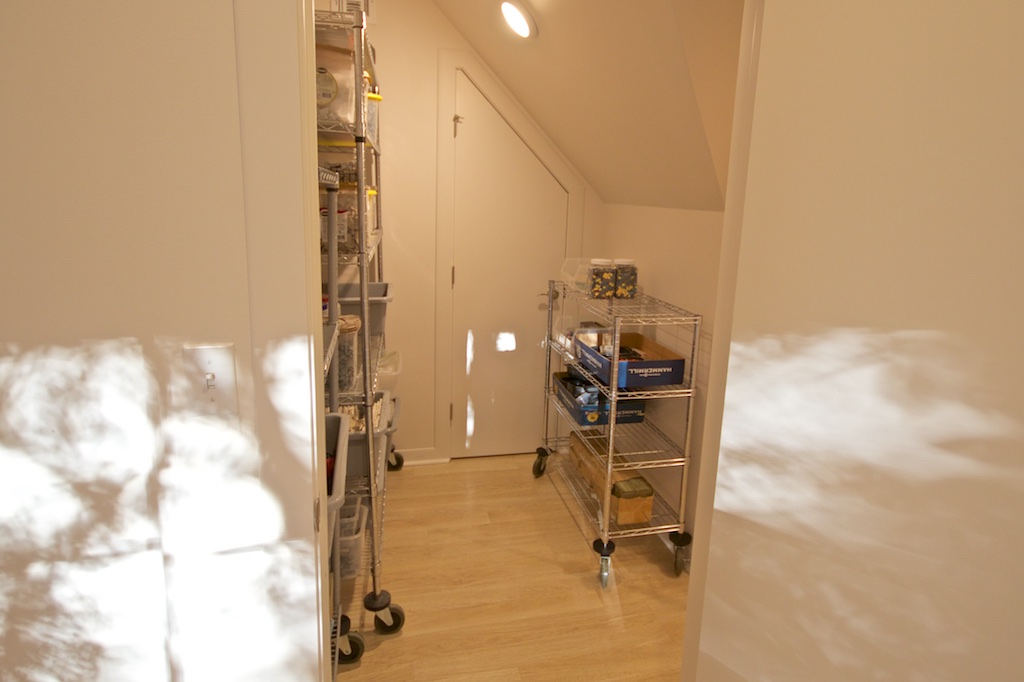
This closet is the closest to the studio. I have some marble inventory in here, other stone. Also, office supplies, studio support stuff, and substrates. That angled door leads to a mechanical area.
Just inside the closet and around the right corner. There is a large duct that we did not want to try to move, so we finished out around it, giving me a little nook that is ideal for substrates and scraps.
Inside the closet, standing in the little substrate nook.
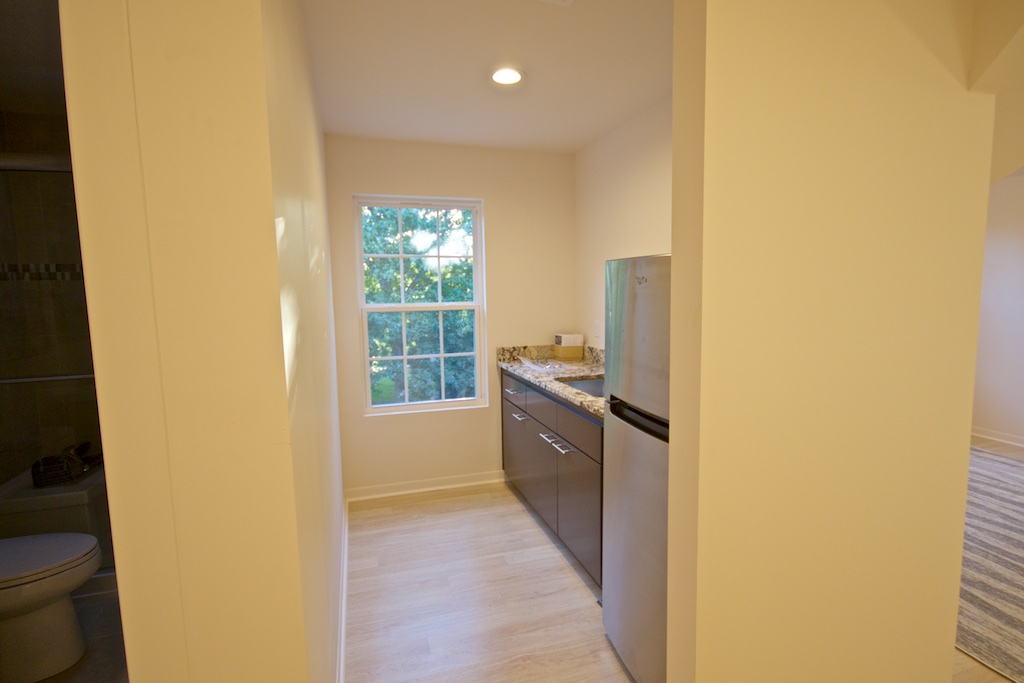
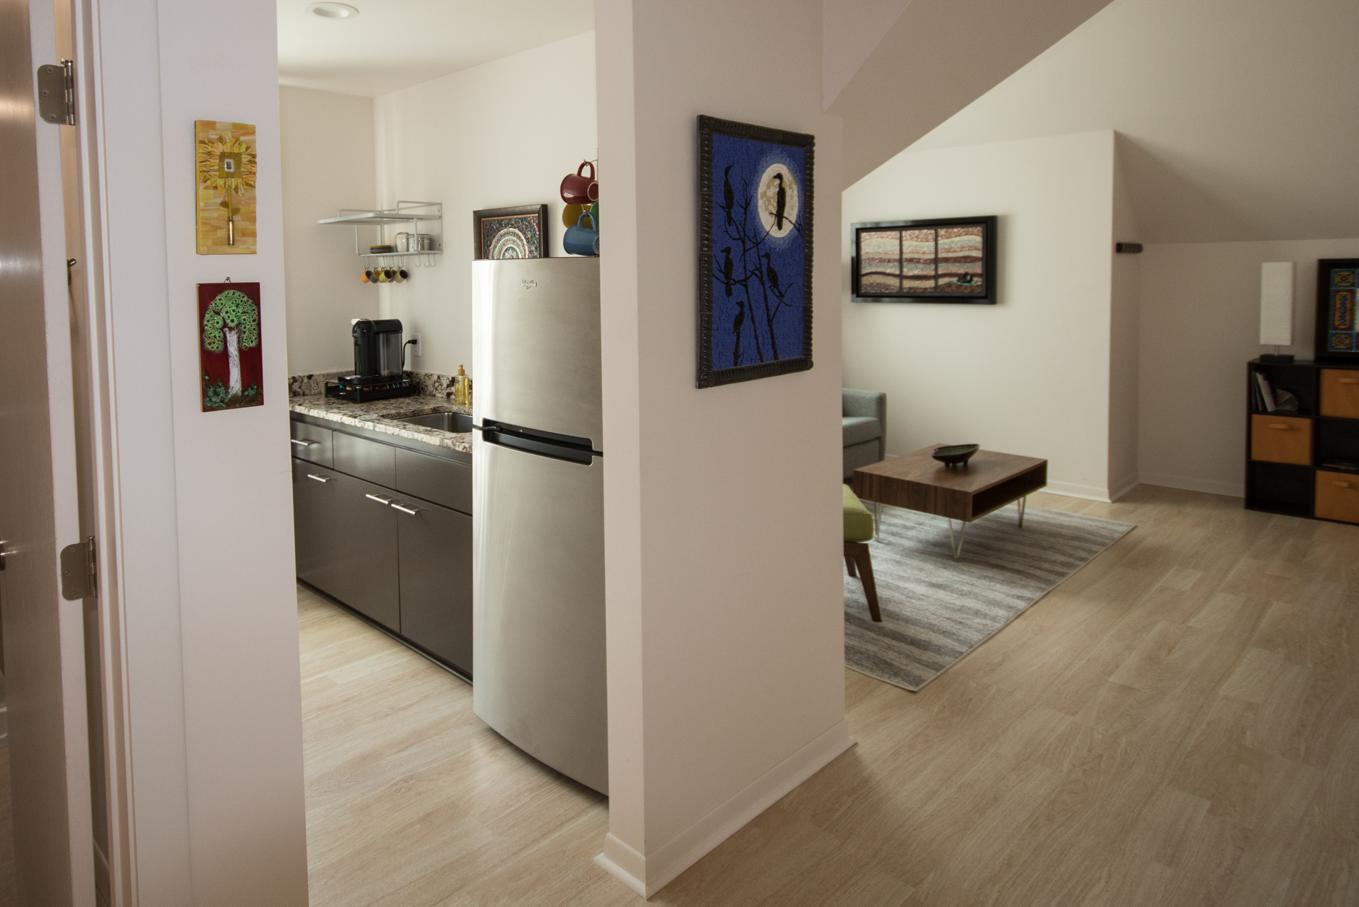
Now heading toward the studio, kitchenette is on the right. Not sure why the walls look yellow in the pic; they are white. Still some decor finishing to do in the kitchen, but no hurry.
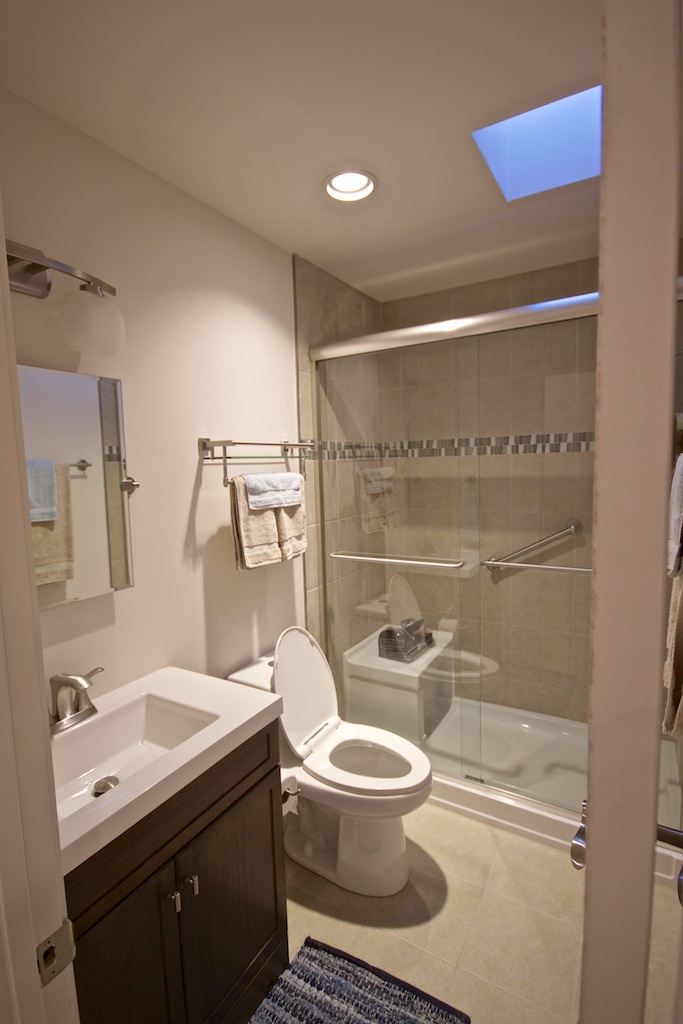
To left of kitchen is the studio bath. One of my projects in queue is a little backsplash.
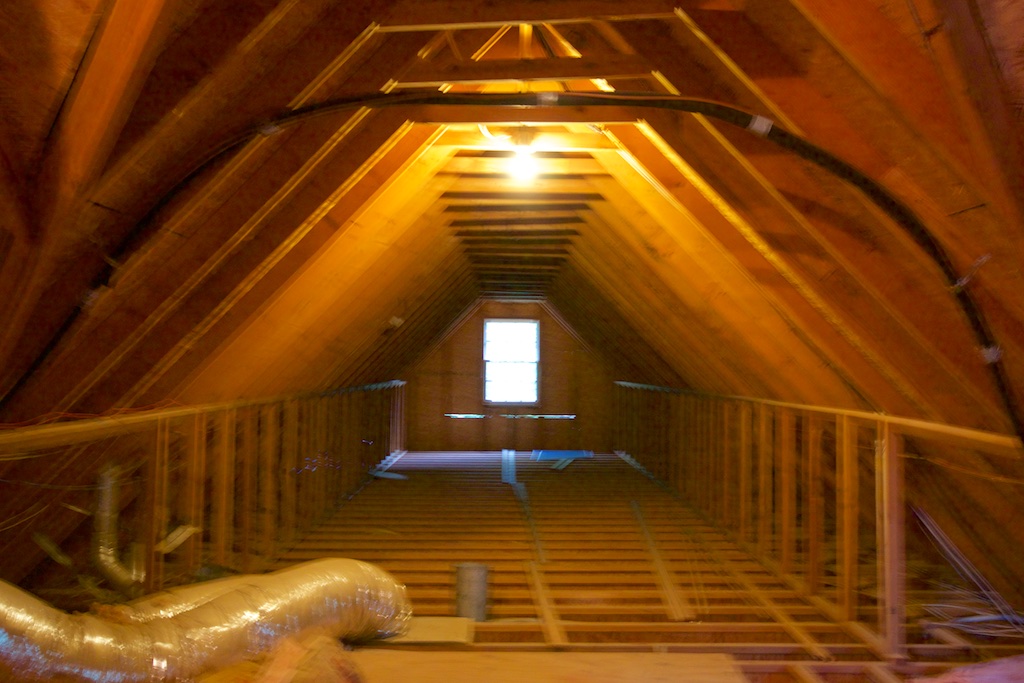
Before: After entering the attic and turning left, looking into the area above the garage. You can see that ductwork, in the lower left, that we finished out in the closet, giving me a nice shelf for substrates and scraps.
Looking into the studio.
Just inside the studio. Marble, stone, minerals along the wall. Tool closet in the little nook. I'm very pleased with my tool closet.
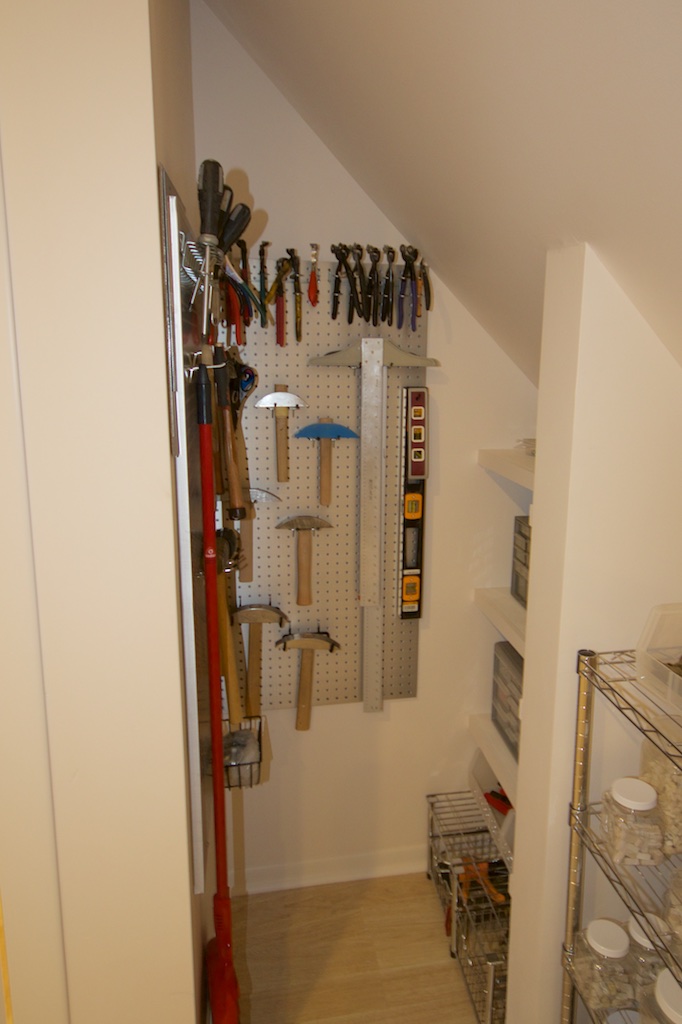
Take a closer look at my tool closet!
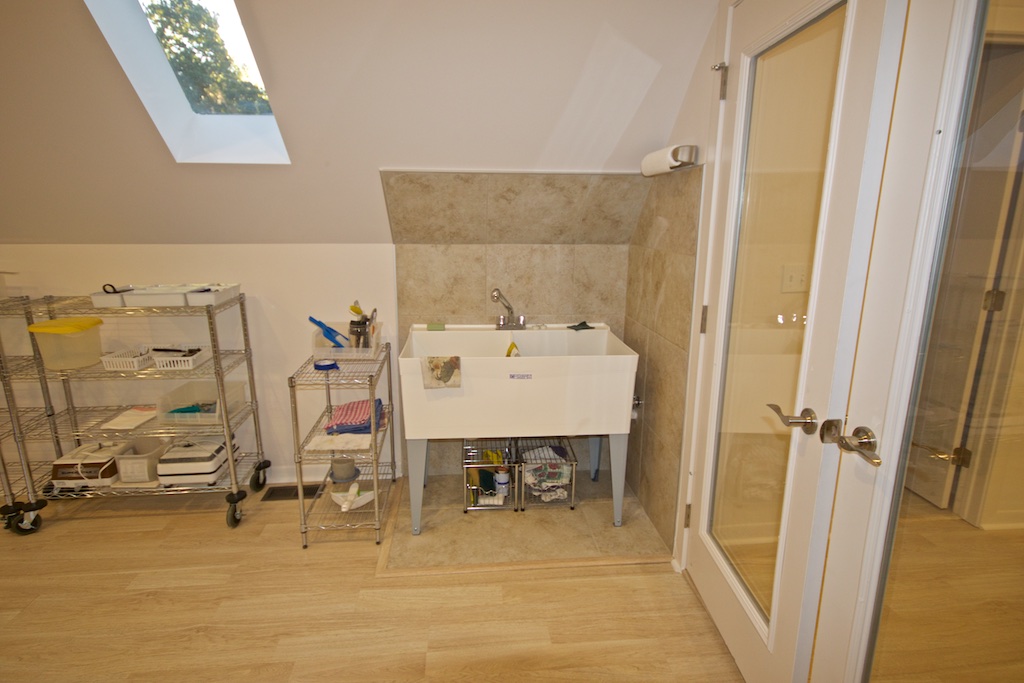
On the other side of the entry doors, my sink area.
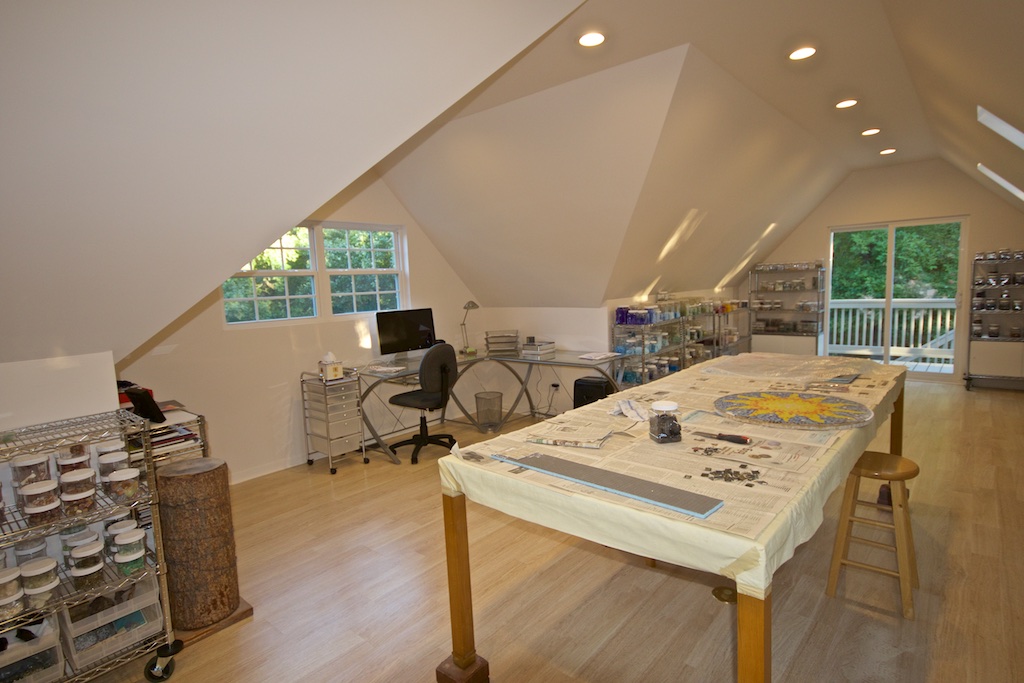
Looking into my office area. I've used an old dining room table as a work table for about 20 years now. It's big and strong. And, yes, it is elevated via pavers. Don't you dare laugh. I'm working on a more attractive elevation technique, and I'm having two more work tables made, approx. 2' x 4' each. They will be the same width and height as my current table.
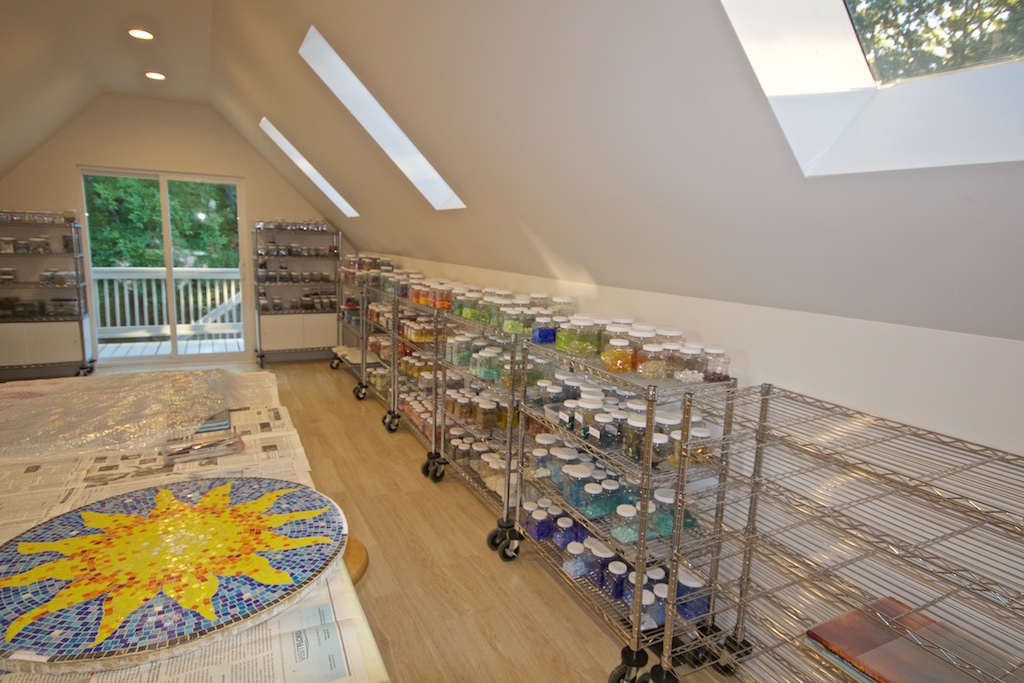
Smalti along the wall. Then unglazed porcelain. Van Gogh and mirror glass on the right of the sliding door.
Vitresou glass. Millefiore and misc. glass at right, which is actually on the left of the sliding door.
Looking back at office area. That empty space is waiting for an awesome retro-modern chair with ottoman! Turquoise. Of course.
Looking back into studio from sliding door.
Current project: Over 15 years ago, I made this table top for a certain offspring, who forgot that it was made for interior use and put it outside a couple of years ago. I'm reworking and replacing the edge tiles.
As to what's in the queue? First up is to repair a table top that I made over 15 years ago, probably more like 18 years ago. I made it for one of my kids, who shall not be named-and-shamed here, and who seemed to forget that it was an interior mosaic and put it outside a couple of years ago. I'm reworking the edge, replacing all the tiles.
My next project will be a small backsplash for the studio bath vanity. It's a small bathroom and I don't want anything too busy or complicated. I predict it will be a rather boring project.
After taking care of these two small tasks, I plan on spending some time finishing a few projects. It will be some time before I start something new, but I've got plenty of ideas for when I'm ready.
Okay, so that's where all things studio stand at the current time. My next and final photo shoot will probably be after the new year. By then, I hope to have furniture and decor figured out.
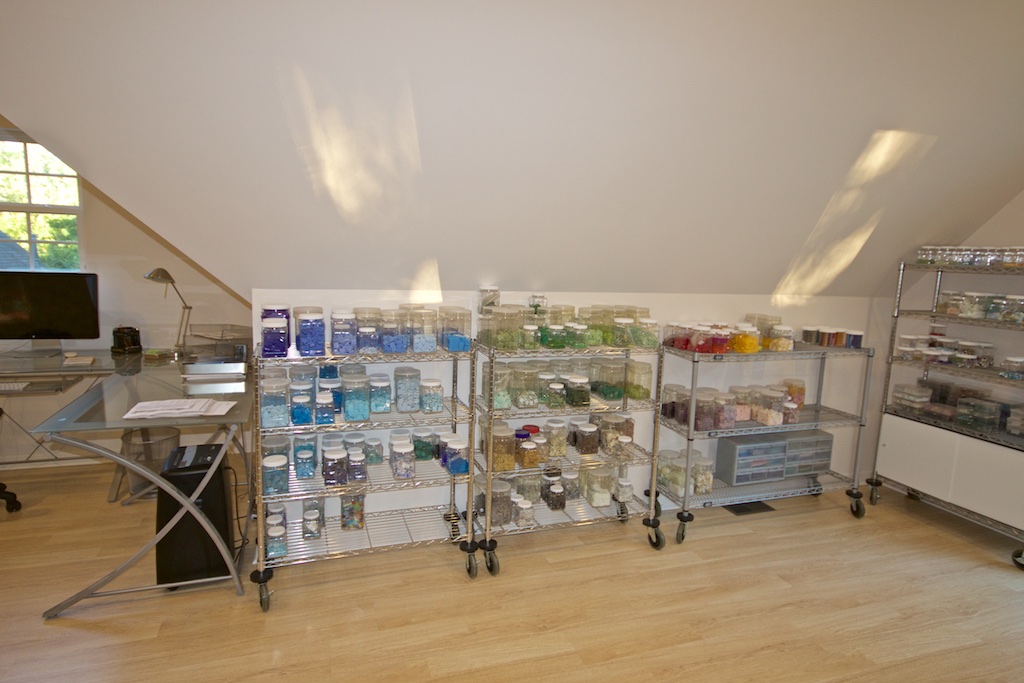
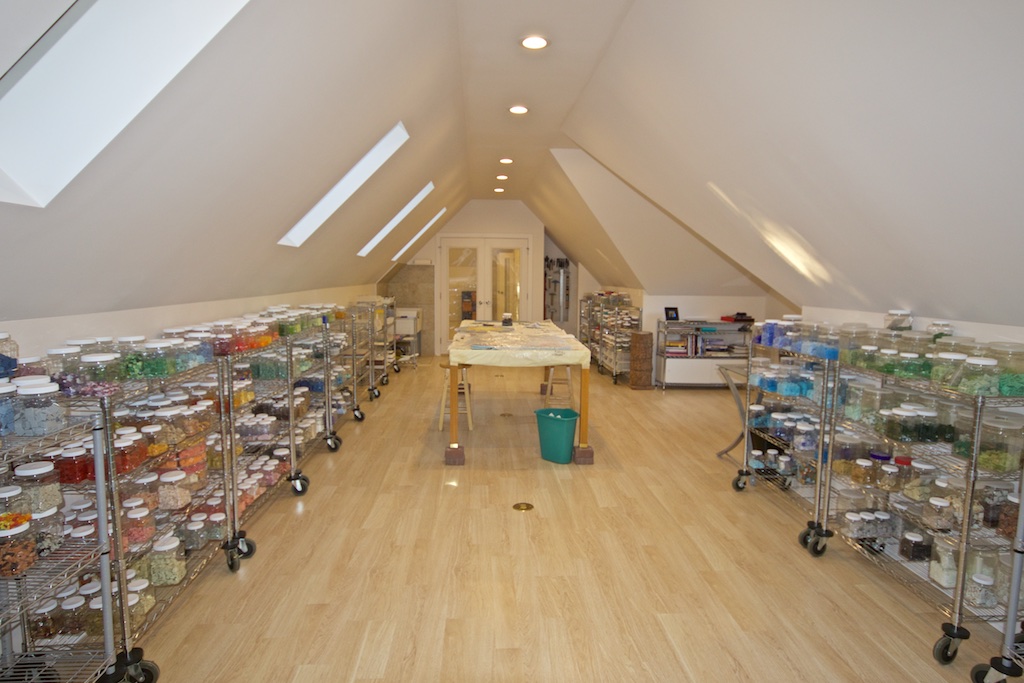
I'm starting to think of organization for my materials in my new studio. I'll have shelves that line the long sides of the studio, probably enough shelving for my smalti (both Mexican and Italian), and vitreous, as well as all my stone, ceramic, other glass, etc. I'll be using clear jars for the tess. In my old studio, I organized colors within material, with only the most-used materials in the immediate studio area. I've got plenty of room in the new studio to have it all—or at least most of it—on the shelves along the walls, so I'm considering how I should group things.
Question: Group materials by color within material, or by material within color?
Color within material: For example, I would have the vitreous grouped together I'm one area, the Mexican smalti together, the Italian smalti together, etc., with each material then grouped by individual shade and value.
Material within color: For example, material within color being all the blue vitreous along with all the blue Mexican smalti along with all the blue Italian smalti, and possibly any other blue material like ceramic, C3, etc. So, all similar shades and values of blues in the same area, regardless of material. Of course, they would then be grouped by shade and value within the color.
Which makes more sense to you? How is your studio organized? I welcome your thoughts!
Okay, so here's the latest on my new studio! It has just been too messy in there to take nice pics, so I waited until they did a cleaning. It's looking fabulous! The walls are up and the trim carpenters are next in line, as well as the air-conditioning. We're getting there, but it's looking like end of July—certainly not end of June, especially since we have to shut down work for a couple of weeks in July while we go on vacation.
View into the studio wing.
Just inside the entry to the studio wing.
The living area/guest room in the studio wing.
Looking down into the studio from the living area.
At the doorway of the studio.
Inside the studio, looking at what will be my office area in the new gable.
Well, this is just too good to be true! I can't believe the transformation of the attic and space above the garage. I'm going for a spacious, clean, light, and airy decor, so I'm keeping flooring and walls very neutral in color and light in shade.
I ordered my flooring a few days ago. After much deliberation, I decided on a laminate in White Hickory. I had laminate in my old studio and it actually held up quite well over 18 years. The laminate was on sale, about .30 per sf less than the vinyl that I was considering. I just did not feel like the vinyl would hold up as well under the foot-crushing of pieces of glass and stone. The studio alone is about 1250 sf—AWE-SOME! We're using the same laminate throughout the new wing.
I've ordered my shelving, thanks to a very generous birthday gift of $$ from my husband and two of my kids. I've also been looking into gallery hanging systems. I have some great new wall space and I love the look and apparent convenience of more professional-looking hanging systems. If anyone has any experience with these, I welcome your advice.
Yes, I'm in that daydreaming, visualizing phase. I'm also in that slightly overwhelmed stage. It will be quite a job to set up a studio of this size—and it's not just the studio, it's the entire space. Then there is also the other end of the house with the new game room. I have not been blogging about that because it's not mosaic-related, but's it's been going on at the same time as the studio wing, although that project is not nearly as complex as the studio wing. We also happen to be replacing our roof and painting the exterior of the house right now.
Yep, I'm ready for that vacation. But, still not complaining. Okay. Maybe just a bit. But it's all great!
Today, there are painters, roofers, and a drywall crew working both outside and inside. Managing the various aspects of our renovation does help keep me busy, but not too busy to miss having a studio and things to make.
So, I'll busy myself by going back in time to the year 2007 or so in my mosaic career. Having returned from a very rewarding Orsoni master class experience the previous year, I decided to take the step from hobby to art, and I started making art. Intrigued and inspired by Maestro Orsoni's directive to Think Mosaic, which I talked about in this post, I started down a path—although not fully conscious of it at the time—to explore what I have come to think of as work that is essentially mosaic.
Etude, detail (2007) My first attempt to Think Mosaic!
What do I mean by essentially mosaic? Well, there are three happenings that helped form my idea of work that is essentially mosaic:
1. The first of the three happenings was when Maestro Orsoni said Think Mosaic, and expounded on what was not mosaic (again, refer to this post).
L'entrata, detail
2. The next happening was in 2008 at the SAMA conference in Miami, I believe, and I met Ilana Shafir and her daughter, Leah Zahavi.
I was sitting with a few other mosaic artists in the hotel restaurant when Ilana Shafir and Leah came in and sat down at the table next to us. Maestra Shafir saw that I had a small portfolio of my work with me and she asked to see it. I quite nervously handed it to her. When she saw a photo of L'entrata (left), she said something like If you want to do this kind of thing, you should just paint it! Then, as she viewed a couple of other small, abstract attempts, she said This is honest work.
3. Finally, I read something Gary Drostle had written about a mosaic in a Mosaic Art Now magazine. I think that it was a juror's choice kind of thing and he was explaining why he chose the particular work. He said something to the effect that it was an excellent example of a work that was essentially mosaic—a work that would not have been as successful in any other medium.
As a bit of a disclaimer, I'm not heavily invested in the term essentially mosaic or the characterizing adjective of essential. I've only seen it mentioned by Gary Drostle, which either points to my lack of exposure or to a lack of the term's use. As another bit of disclaimer, when I talk about work that is essentially mosaic, I am not referring to a quality characterization, but primarily a type. Work that is essentially mosaic is not necessarily better or more valid that any other kind of mosaic. This is my view.
I'll end this post at this point and let you ponder the idea of essential mosaic, as I have come to understand it based on my recollection of the comments of Orsoni, Shafir, and Drostle.